

Auto Presentation Switcher
User Guide PC
On this page User Guide PC
0. Introduction
Auto Presentation Switcher (APS) helps you display presentations, images and videos on your computer. You can switch presentations seamlessly, display videos and images on top of your presentations, and display a screenshot when no presentation is displayed.
APS can be controlled from the user-interface, using global keyboard-shortcuts, or over the local network using APS Hub or Bitfocus Companion.
APS opens on the Media Player tab. The main tabs are Media Player, Still Images, Presentations, Webpages and Settings.
1. Compatibility
1.1 System requirements and supported software
Windows requirements
64-bit Windows 10 version 20H2 (build 19042) or later, including Windows 11. Microsoft .net framework 4.8.1
Microsoft c++ redistributable
Programs and file extensions
PowerPoint:
PowerPoint 365 latest version and older versions including PowerPoint 2016 is supported. Both 32 and 64 bit versions of PowerPoint can be used.
PowerPoint file-extensions:
.pptx, .ppt, .ppsx, .pps, .pptm and .ppsm. We recommend using pptx format.
PDF
Programs:
Adobe Reader 64 bit
Adobe Acrobat DC 64 bit
Okular
PDF file-extensions
.pdf
Still-images
Jpeg, PNG or TIFF files
Media player
MPEG (ES,PS,TS,PVA,MP3), AVI, ASF / WMV / WMA, MP4 / MOV / 3GP, OGG / OGM / Annodex, Matroska (MKV), Real, WAV, JPEG, PNG, TIFF
Web browsers
Google Chrome
Media format support depends on the codecs inside the file; test picture, sound and playback on the show computer.
1.2 Network control
APS can be controlled over the local network through its public API. The API is free for anyone to use directly, whether you want to build your own controls or connect APS to other systems.
APS Hub and Bitfocus Companion are two ready-to-use integrations that use this same API to control APS:
APS Hub
APS Hub is a separate, free app for controlling one or more APS computers over the local network from a web browser. APS runs on each presentation computer, while Hub can run on one of those computers or on a separate Mac or Windows computer. See the APS Hub user guide for requirements and setup.
Bitfocus Companion
Bitfocus Companion is a separate app that lets you control APS from a Stream Deck or Companion’s web buttons. It connects to APS over the local network using the APS Companion module. See the Companion connection guide for setup.
The font controls described in Fonts require APS 4.6 or later. To use them from Hub, use APS Hub 1.1 or later.
2. Installation and licence
2.1 Installation
Download the application and run the installer. When the app starts for the first time it will enter trial-mode. In this mode the app will work normally for 20 minutes and then close. To use the app without restrictions, licenses must be installed.
2.2 Verify that the program is running
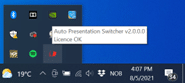
The program-icon can be found on the bottom right corner on the taskbar. This icon means that the program is active.
2.3 Activating the licence on a new computer
After you buy a licence, this will be e-mailed to you. When you open APS, you will first see this menu:
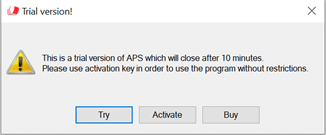
Push Activate. Now copy and paste the licence-code from your mail into the activation field and push “Activate”. The licence is now installed
! This process requires Internet-connection, and your computer must be able to contact our server which is placed on the domain www.presentationtools.com. Make sure that no firewall on your computer prevents the APS application from contacting our server.
2.4 Using the licence
The licence can only be activated on one computer at a time. The licence-key is stored in the user-data on your computer. This means that if you change the user, you will have to repeat the activation-process, or use another licence.
After you have activated the licence to your computer, you can use APS also while not connected to the Internet.
2.5 User-account on PresentationTools.com

If you have a yearly subscription for your licence, you can monitor and release your APS licences from our webpage. To do this you need a user-account using the same email-address registered to your licences. Accounts can be created from this page. You must verify your Email-address to complete the process. After the user has been created, you can go to the Dashboard-page and manage your licences from there.
To access your licences, push the “Keys” button for your subscription.
2.6 Switching the licence to a new computer
From the image above you can see that the APS licence is “In Use”. This means that this licence is now activated on a computer. To use the same licence on a different computer, you first need to deactivate the licence from your current computer. You can do this by pushing the Release button. The licence will now be free to use on a different computer. The old computer with the licence does not need to be online for this process to work.
The second way to release the licence is directly from the user-interface in the application. Open the licence controls in APS Settings and use the release control. This process requires Internet connection.
! Note that uninstalling the application itself does not de-activate the licence, since this process does not involve our web-server. It is possible to have a licence registered to the computer also when APS is not installed on the machine.
To activate the licence on a new machine, repeat the steps from 2.3
2.7 Computer tag
If you tag the computer, this name will be shown in the user-dashboard under “Computer Name”. This can be a useful feature if you need better control of which computer(s) has the licence(s) installed.
3. Control presentations with keyboard shortcuts
APS registers these shortcuts globally, so its main window can stay in the background. Presentation commands act on the active supported presentation app. Keep that app in focus when switching files; if you click another program, return to the presentation first.
Use Ctrl + Right Arrow to open the next presentation in the folder in full screen. Sort files alphabetically or numerically in running order. These shortcuts switch presentation files; use the usual clicker or arrow keys to advance slides within a file.
| Shortcut | Action |
|---|---|
| Ctrl + Right Arrow | Open the next presentation in the folder in full screen. |
| Ctrl + Left Arrow | Open the previous presentation in full screen. |
| Ctrl + Down Arrow | Open the next presentation without starting its slideshow. |
| Ctrl + Up Arrow | Start the active presentation in full screen. When already in full screen, close other presentations, subject to the PDF exceptions below. Also puts an active APS-controlled Chrome window into full screen. |
3.1 Prepare presentations
1. Put the presentations you want to display in one folder. Leave all other files outside this folder or put them in a sub-folder.
2. Rename the filenames of the presentations so that they are sorted alphabetically or numerically in the order they will be displayed.
Example:

Or you could use the time of the day:
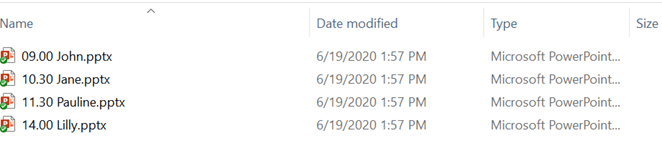
Check the order by sorting filenames in File Explorer. The examples above show two possible naming schemes.
3.2 Switching between presentations
Open a supported presentation in full screen. Ctrl + Right Arrow opens the next presentation in full screen; Ctrl + Left Arrow opens the previous one. Ctrl + Down Arrow opens the next presentation without starting its slideshow.
In Controlled file-handling mode, the current file must be in the selected watched folder. See Presentation folders and Settings.
3.3 Put files in fullscreen with Ctrl + Up Arrow
With a supported presentation app in focus, Ctrl + Up Arrow starts its fullscreen presentation. PowerPoint uses its own slideshow display settings. APS uses Main presenter screen for supported PDF workflows. This shortcut also puts an active APS-controlled Chrome page into full screen. See Control Google Chrome.
3.4 Close other presentations
When PowerPoint is already in full screen and has focus, Ctrl + Up Arrow closes other PowerPoint documents and documents in the selected PDF app. Save edits first.
With a PDF already in full screen, Ctrl + Up Arrow behaves according to the selected PDF app: Acrobat closes its other documents and PowerPoint documents; Okular leaves its PDF documents open and closes PowerPoint documents; Adobe Reader closes PowerPoint documents if PowerPoint is running, otherwise it reopens the current PDF. Save work before using a close command.
Escape normally exits the focused presentation’s slideshow. Exiting a slideshow does not necessarily close its document. Use the still-image eject or Media Player Stop controls to remove those outputs. For shared clicker control, see Hub’s Clicker Distributor.
4. Still images
The still-images is a high-quality image-viewer that can display up to 10 different user-selected images and screenshots, along with internal “black” and “test” image. You can also take a screenshot and display it instantly, known as the “freeze” command.
4.1 Still-images menu
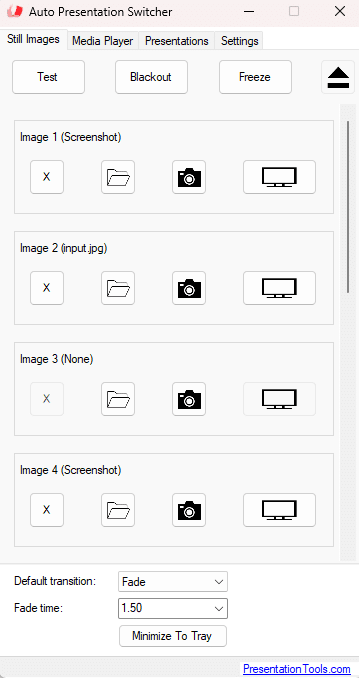
From here you can display images that are screenshots or files from the disk.
The images will always be captured and displayed in the Main Presenter Screen which can be set from the Settings menu. (see Settings)
Buttons are explained below
Display color bars

Display black screen

Take a screenshot of the Main Presenter Screen and display that as an image
Image 1-10
There are 10 user-configurable images that can be displayed. They can be set in 2 different ways:

Load image from file. This button also works with drag and drop.

Take a screenshot of the Main Presenter Screen and load this as the selected image
These two options above will override what was previously selected. To delete the selection, press the X button at the right edge of the row. Eject a displayed image before deleting its selection.

Display the selected image. The active image button is highlighted.

If an image is displayed, this button will eject the image.
4.2 Keyboard shortcuts for still images
These global shortcuts do not depend on presentation focus. Use Control + Shift on both platforms, including Mac. Capture replaces the image in the selected bank; it does not display it.
| Shortcut | Action |
|---|---|
| Control + Shift + 1 | Display image bank 1. |
| Control + Shift + 2 | Display image bank 2. |
| Control + Shift + 3 | Display the test pattern. |
| Control + Shift + 4 | Blackout. |
| Control + Shift + 7 | Capture the Main presenter screen into image bank 1. |
| Control + Shift + 8 | Capture the Main presenter screen into image bank 2. |
| Control + Shift + F | Freeze: capture and display the Main presenter screen. |
| Ctrl + Shift + K | Eject the still-image output. |
Transitions and visible output
Choose Cut or Fade and set the fade time in Still Images. These transition settings are separate from Media Player’s. With image toggling enabled in Settings, repeating an active image command can turn it off; use Eject to remove it explicitly.
A still image, Freeze or Blackout can cover a presentation while its slides, video or audio continue underneath. It does not pause or mute playback. If Keep media player above still images is enabled, media stays above the image, including Blackout. Check the audience screen and stop media when it must stop.
Use still images from APS Hub, including bank assignment, capture and group controls.
5. Media player
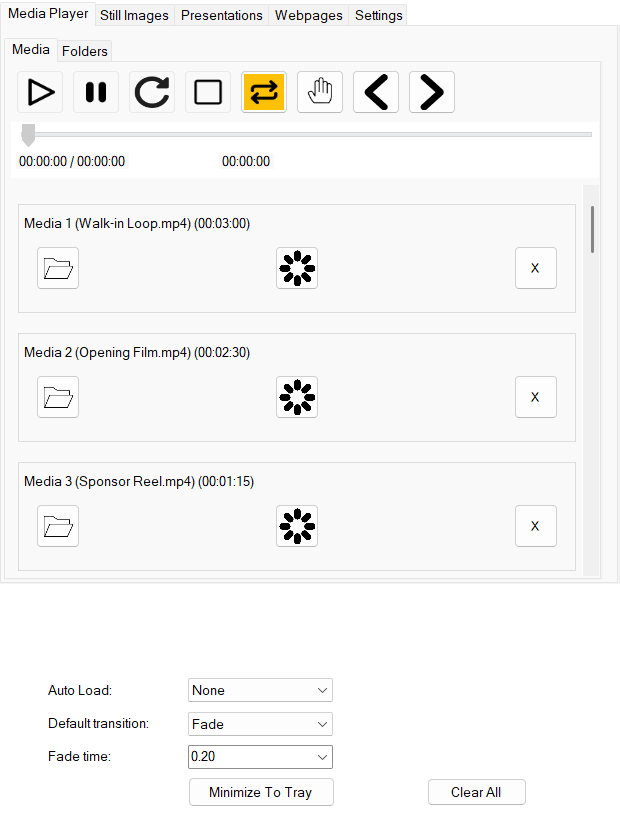
The media-player allows you to play up to 40 different videos, images or audio-files. The media will be displayed on the screen chosen from “Main presenter screen” in the settings.
5.1 Getting started
First, choose a media for the slot by pushing the folder-icon, or drag and drop a media-file onto the button.
Before a media can be played, it must be loaded. Load a media by pushing the load-icon. Then the next time you push the play-button, the media will play.
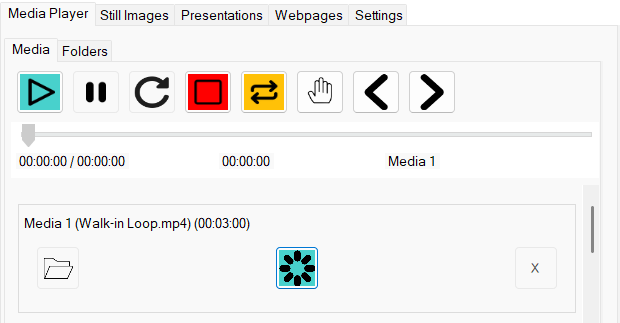
Without Loop or Hold at end, a video plays to its end. If you quickly need to exit the video or image, push the “stop” button. If the user-interface is covered by the video, you can first click the video window, then press Escape.
Assigning a file, loading it and playing it are separate actions. The loaded item and the currently playing item can differ when you prepare the next file. Check the loaded filename before pressing Play. See assigning and loading media from Hub.
can play up to 40 different videos, images or audio-files. The media will be displayed on the screen chosen from “Main presenter screen” in the settings.
5.2 Playback buttons


The play-button will start the loaded media from the beginning.

Toggle pause/play on the currently playing video

Restart the playing video

Stop the playing video, or, if a video is loaded but no video is playing, remove the load so that no media is selected for playback.

Loop the video

Hold at end. The video will freeze at the last frame.

Loads the previous media in the list. For example, if video 3 is loaded, this button will load video 2 if a media exists there.

Loads the next media in the list, mirroring the previous button
Previous and Next load a media item; they do not start playback. For a predictable ending on either platform, turn Hold at end off when using Loop, and turn Loop off when using Hold at end.
5.3 Timeline

For video and audio file, the timeline will show the progress of the video, total duration and name of the media. You can drag the cursor to a new playback-position.
5.4 Select and load media


Shows the media-slot number, name of the media-file, and length.

Remove the selected media with the X button at the right edge of the row. Unload and stop the media before clearing it.
Select media. You can also drag and drop media-files to this button to select them.
Load
Prepare the selected media for the next Play command. The spinner-shaped button turns turquoise when the slot is loaded.
5.5 Options at the bottom of the menu
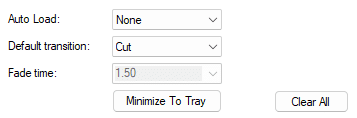
Auto-load
Select which video will load next after a video/media has started. “None” will select no media. “Repeat” will load the same media again. “Next” will load the next media in the list.
Default transition
Select how playback will start and end. With the fade-option you can fade the video in and out with the desktop-background. Note that you cant crossfade between videos, only fade in/out the vide-window.
The fade-time sets the duration of the fade when fade-mode is selected. Media Player and Still Images have separate fade-time settings.
5.6 Keyboard shortcuts for the media player
These global shortcuts use Alt + Shift. APS must be running.
| Shortcut | Action |
|---|---|
| Alt + Shift + 1 | Play the loaded media from the beginning. |
| Alt + Shift + 2 | Pause or resume playback. |
| Alt + Shift + 3 | Restart playback. |
| Alt + Shift + 4 | Stop playback. |
| Alt + Shift + 5 | Toggle Loop. |
| Alt + Shift + 6 | Toggle the Fade transition. |
| Alt + Shift + 7 | Load the next media item; does not start playback. |
| Alt + Shift + 8 | Load the previous media item; does not start playback. |
| Alt + Shift + 0 | Close all media output. |
5.7 Using the Still-Images and media-player together
In Settings, enable Keep media player above still images to keep media above APS still images, Freeze, Blackout and Test. This option is off by default on Windows. When it is off, the most recently displayed APS output can appear above the other. The still-images can then act as a bottom layer with the media player. For example, you can use this to make the background black when no video is playing, or display a background company-logo.
Media folders
In Media Player → Folders, assign a folder and select it as watched. APS lists files directly inside that folder, excluding subfolders. Prepare folder paths in the native APS app. Hub can select configured folders; see Hub’s Media Player.
Auto Load prepares the next selection after playback starts; it does not automatically play the next file. Clearing a slot or using Clear All removes assignments, not the original files.
6. Slot presentations and folders
6.1 Presentation slots
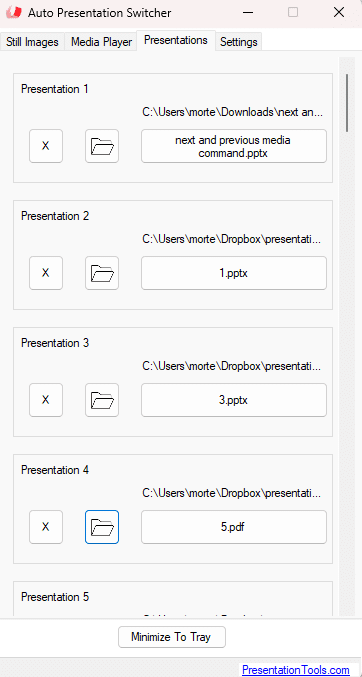
The slot-presentations lets you choose 40 presentations that you can open and display from the APS menu or through the network using APS Hub or Companion. This menu has 3 buttons which are explained below:
Push this button to select the presentation for the slot. You can also drag the files to this button to select them.

The X button at the right edge of the row removes the selection.
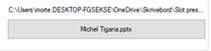
Displays the presentation in fullscreen. The button shows the filename of the presentation, and on the top you find the filepath.
A slot points to a file on this computer; it does not contain a copy. Assigning or clearing a slot does not open or delete the file. If you rename or move the file, update its assignment. See presentation slots in Hub.
6.2 Presentation folders
With APS 4.5.0.2 and APS Hub 1.0.1, Hub can compare the names and contents of watched presentation files. Content checking requires an active APS licence and runs only while a compatible controller requests it. Checks pause while presentations or webpages are being prepared and during Media Player video playback. Online-only cloud files are reported without downloading them; make the files available locally before using them in a show.
In Hub, use Presentations → Folders → Manage folders to add files to a configured presentation folder or delete eligible presentations to Recycle Bin. The destination does not need to be the currently watched folder. Uploads require incoming file transfers to be enabled in APS. Existing filenames offer Save as, Overwrite or Skip; APS refuses unsafe changes to open presentations or while preparing a presentation. See the Hub file-transfer guide.
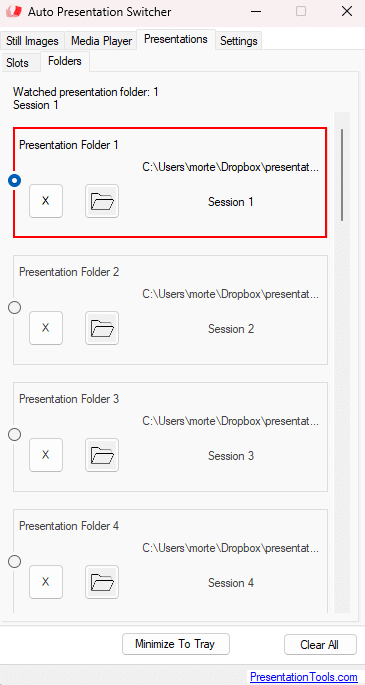
You can select a folder with presentations that you can monitor over the LAN-network through Companion. From the menu, choose up to 20 folders, and select one of them to be “watched”. This folder will be monitored in real-time, and changes to the presentation-files will be updated: if you delete a presentation in the folder, or do name-changes, APS will be notified.
The video below shows how you can use this feature in Companion: You can toggle between your presentation-folders and create a page that shows all the presentations from the watched folder. And you can start the presentations from the same buttons.
To watch a folder, open Presentations → Folders, assign its path and select the radio button beside it. Check that the expected files appear. Only files directly inside the folder are listed; nested folders are excluded.
For multiple computers, prepare matching copies of the files in each computer’s watched folder. The paths may differ, but filenames and contents must agree. See watched-folder controls, Presentation Sync preparation and file verification, and uploads to presentation folders.
6.3 Fonts
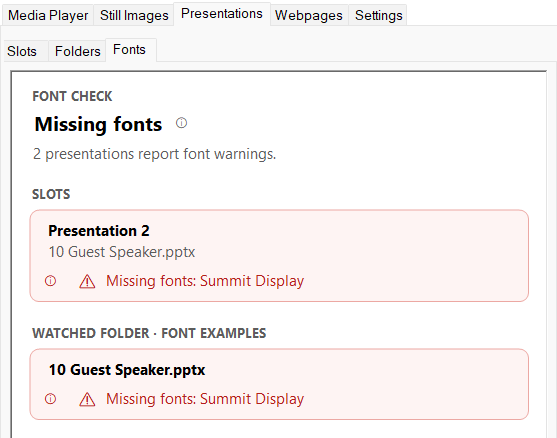
Font checking is optional and off by default. Turn on Check presentation fonts in Settings → Presentations, or use Turn on font check in Presentations → Fonts. You can also change the setting from APS Hub 1.1 or later.
APS checks PowerPoint presentations assigned to slots and files in the watched folder. Open Presentations → Fonts to see the reports, or choose View in Fonts beside an affected slot or folder. Each warning has an information button explaining what it means.
Reports can identify missing fonts, fonts used only in speaker notes, Office fonts that need downloading, restricted or preview/print-only embedded fonts, unresolved font references, and incomplete checks. For Font download needed, open the presentation in PowerPoint while online and let it download the fonts before presenting offline. For missing fonts, obtain a licensed copy from the presentation’s author or use a version of the presentation with different fonts.
PDF and legacy .ppt and .pps files are not checked. Font checks do not change presentations or install fonts. No warnings does not guarantee identical rendering; review the presentation in PowerPoint before the show.
Restart PowerPoint
If a font was installed while PowerPoint was running, PowerPoint may keep using a substitute until the whole application restarts. When APS reports PowerPoint restart needed, choose Restart PowerPoint now in the Fonts view, or request the restart from APS Hub. Save every open presentation, end the slide show and close Protected View windows first. APS checks that it can restart safely, then restarts PowerPoint and reopens the presentations. Follow any message about files that need reopening manually.
Install fonts from APS Hub
Enable Allow incoming file transfers and Allow remote font installation in Settings → Network → File transfer on this PC. Then use the font controls in APS Hub 1.1 or later to install .ttf or .otf files for the current user. Remote font installation is off by default and its permission cannot be enabled from Hub. Installing fonts does not automatically restart PowerPoint. See installing fonts from Hub.
7. Settings
Settings is divided into General, Presentations, Media and Network tabs. Scroll within each tab to see all its groups. Push an information button beside a setting for an explanation in APS.
General
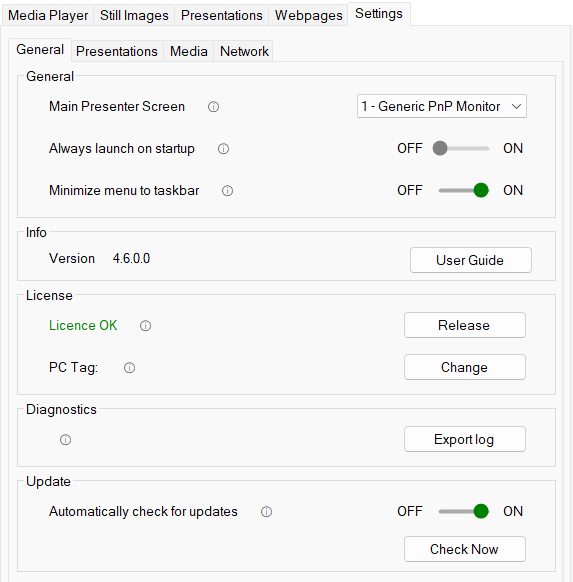
Version and User Guide
Version shows the installed APS version. User Guide opens the PDF guide supplied with the application.
Licence
Shows the licence status. Use Release to deactivate the licence on this computer so it can be used on another computer. For activation and licence management, see 2. Installation and licence.
PC Tag
Use Change to give this computer a name. The tag helps you identify which computer is using a licence in the online user-dashboard, and is also shared with compatible network clients.
Automatically check for updates
When enabled, APS checks for a new version at startup and asks you to update if one is available. Use Check Now to check manually, including when automatic checking is off.
Main Presenter Screen
This selects the screen APS uses for still images, screenshots, screen capture and Media Player images and videos. It also determines the display used by APS-controlled PDF presentation methods. PowerPoint uses its own slideshow display settings.
Auto selects the extended display. If more than two screens are connected, or your display layout is more complex, select the screen manually.
Always launch on startup
When this setting is on, the program will start automatically when you sign in to Windows.
Minimize menu to taskbar
When enabled, APS remains visible in the Windows taskbar when minimized. When disabled, it minimizes to the system tray near the clock and continues running in the background.
Diagnostics — Export log
Open Settings → General to reach Diagnostics. Export log saves a copy of the APS diagnostic log as a text file in a location you choose. Use it when troubleshooting with support.
Presentations
Seamless switching
When switching between presentations in fullscreen, APS holds a screenshot of the current slide while preparing the next presentation. This hides the desktop and application windows during the transition. Use PowerPoint or Okular for seamless presentation switching; Adobe Acrobat Pro does not handle this reliably.
Link presentations
With this setting on: When you are at the end of a presentation, pushing “next” on the presentation-clicker will bring you to the next presentation in the folder. Likewise, when you are at the beginning of a presentation, pushing “previous” on the clicker will take you to the previous presentation in the folder.
This method works with PowerPoint, Okular and Adobe Acrobat Pro. It does not work with Adobe Reader.
Presentation file handling
APS supports two ways of determining which presentation file is currently active. This is used when switching to the next or previous presentation in a folder, among other commands.
Automatic (default)
APS asks the presentation app for the full file path of the current document. This works in most cases, but can fail with cloud-based files, shared folders, or files opened from unexpected locations. If the file path cannot be resolved, APS shows an error.
Controlled
APS uses the watched folder as the source of truth. It asks the presentation app for the document name and matches it against the watched folder, using that folder’s files and order to identify and control the active presentation. If the current file is not found in the watched folder, APS shows an error and stops. This mode provides more predictable behavior in live event setups. See 6. Slot presentations and folders to choose the watched folder.
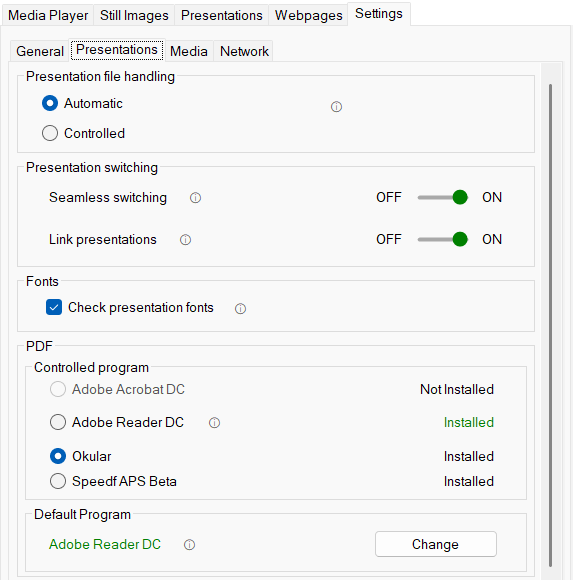
Check presentation fonts
This is off by default. Turn it on in Settings → Presentations to check PowerPoint presentations in slots and the watched folder. Turning it off stops checking and clears the reports; turning it on starts a fresh check. The setting is saved and can also be changed from APS Hub 1.1 or later. See Fonts.
PDF — Controlled program
Select the application APS should use to control PDF presentations: Adobe Acrobat DC, Adobe Reader DC or Okular. Only installed applications can be selected. Adobe Reader is the free Adobe application; Acrobat is the paid application with additional features.
PDF — Default Program
This shows the application Windows uses to open PDF files by default. It can be different from the controlled program selected above. Change opens the Windows default-app settings. We recommend using the same application for both.
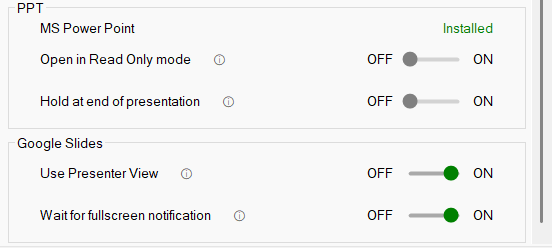
PPT — Open in Read Only mode
By default, APS opens PowerPoint files in edit mode. Enable this option to open them in read-only mode instead.
PPT — Hold at end of presentation
When enabled, advancing past the end with the clicker, keyboard or APS controls holds the presentation at the end instead of exiting the slideshow. This prevents an extra press from exposing the desktop to the audience.
If Link presentations is on, APS advances to the next presentation in the folder instead; Hold at end takes effect at the end of the last presentation. Esc can still exit the slideshow, and a mouse click at the end follows PowerPoint’s normal behavior.
Google Slides — Use Presenter View
When enabled, APS opens the slideshow for the audience on the configured presentation screen and places the presenter view on the other screen when available. The operator can see notes, timers and upcoming slides while the audience sees the presentation.
When disabled, APS opens Google Slides as a normal fullscreen browser page without the separate presenter view.
Google Slides — Wait for fullscreen notification
Chrome can briefly show a fullscreen notification when APS opens Google Slides in fullscreen. Enable this option to keep the seamless overlay visible a little longer and hide the notification during the transition. It has no practical effect when Seamless switching is off.
Media
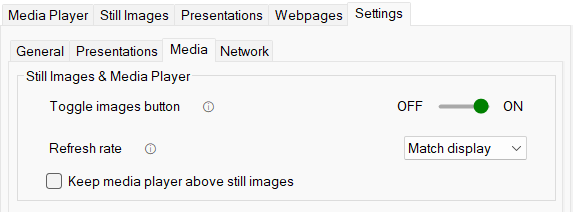
Still Images & Media Player — Toggle images button
When enabled, the same image button or command can turn an image on and off. When disabled, use the eject command to remove the displayed image.
Refresh rate
Determines how often APS updates its graphic output windows. Match display follows the refresh rate of the output monitor and is the default. You can also select 50 Hz or 60 Hz for a production system running at a fixed rate. If you are unsure, keep Match display.
Keep media player above still images
Choose whether media stays above APS still images, Freeze, Blackout and Test. The default is off for Windows. Turning it off restores ordering by the most recently displayed APS output. The setting is saved and can also be changed from a compatible APS Hub.
Network
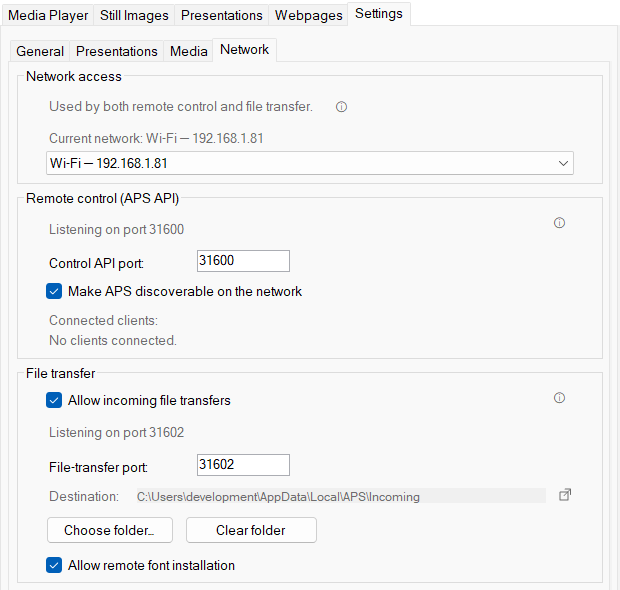
Network access
Choose which network APS uses for both remote control and incoming file transfers. Current network shows the active selection and address.
- All networks: accepts connections through all active IPv4 networks.
- Localhost: accepts connections only from programs on this computer. Use this when your controller runs on the same PC and other computers do not need access.
- A specific Ethernet or Wi-Fi interface: restricts both services to that network. If the selected interface becomes unavailable, APS keeps its listeners offline instead of falling back to all networks.
Changing the network selection restarts the listeners, so connected controllers need to reconnect.
Remote control (APS API) — Control API port
This service receives commands from APS Hub, Companion and other compatible controllers. The default port is 31600. Edit the number and choose Apply to change it, or Cancel to discard the edit. The Listening on port line shows the port actually in use; an unapplied number is only a draft.
Changing this port disconnects current remote-control clients. Controllers connecting by address and port must use the matching port. Remote control and file transfer must use different ports.
Make APS discoverable on the network
Allows compatible apps such as APS Hub to find APS automatically on the selected network. Turning it off stops discovery advertising; direct connections to the selected address and port still work. Localhost never advertises APS to other computers.
Connected clients
Lists the clients connected to the remote-control service, with their addresses and connection times. Clients that identify themselves can also show their name, type and reported sync-group role. Other connections appear as unidentified clients. Hover over the list for full details. These descriptions identify connections for troubleshooting; they do not grant or restrict access.
File transfer — Allow incoming file transfers
Enables the separate service used by compatible clients such as APS Hub to send files to APS. Turn it off to stop accepting incoming files. Remote control remains a separate service and uses its own port.
Allow remote font installation
This is off by default and can only be enabled in the native APS app, under Settings → Network → File transfer. Incoming file transfers must also be enabled. APS Hub can then install .ttf and .otf fonts for the current Windows user. Installed fonts remain after APS exits. Installation does not automatically close presentations or restart PowerPoint.
File-transfer port
The default is 31602. Edit the number, then choose Apply, or use Cancel to discard the edit. Listening on port shows the active port. Changing this port does not disconnect remote-control clients. Both services use the Network access selection above.
Destination and folder controls
Destination shows the incoming folder. Use Choose folder to select it, or drag a folder onto that button. The open-folder icon beside the path opens it in File Explorer.
Clear folder permanently deletes every file and subfolder in the selected incoming folder and cancels any transfer in progress. APS asks for confirmation before clearing it.
For sending files from Hub, including transfers to configured presentation folders, see the Hub file-transfer guide.
8. Control with Companion
Companion is an open-source software that lets you control multiple devices through the local network. It is possible to connect a Stream Deck box with buttons for better hands-on operation, or you can use a web-browser. For more info and download-links, please go here: www.bitfocus.io
8.1 Companion compatibility
Use a current stable Companion release with the PresentationTools: Auto Presentation Switcher connection. Available actions depend on the installed APS module version. See the official APS connection page; do not assume features from a beta module are in the stable release.
8.2 Connect Companion and APS
- Start APS and Companion on computers that can reach each other on the local network.
- In Companion’s Connections, add PresentationTools: Auto Presentation Switcher.
- Set Target IP to the APS computer’s address. Use
127.0.0.1only when both apps run on the same computer. - Set Target Port to the active APS Control API port, normally 31600. Read the Listening on port value in APS Settings.
- Save and check that the connection is healthy.
To change the port, edit it in APS Settings and choose Apply, then use the same value in Companion. If connection fails, check APS’s selected network, address, active port and firewall. Localhost prevents controllers on other computers from connecting. See Settings and the illustrated Companion connection guide.
Companion preset examples below show an earlier interface. Use the connection settings above and the presets included with your installed module.
8.3 Add buttons
There are two ways to add commands in Companion. The easiest is to use the presets, then drag and drop the actions you need. Most of our commands can be found there.
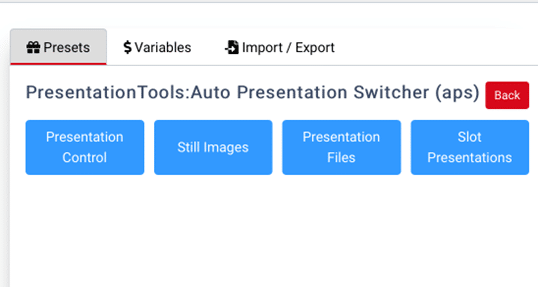
You can also import the commands and customize through the regular button-menu
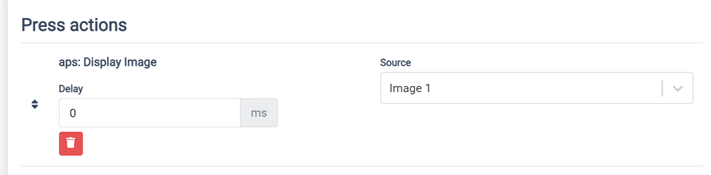
8.4 Use the commands
Assign a test presentation to slot 1 in APS, drag its Companion preset onto a button page and use Test to confirm the correct presentation opens. Then operate it from Companion’s web emulator or a Stream Deck. Check the selected connection when controlling several computers. See the downloadable APS Companion pages.
8.5 Youtube tutorials
We are creating videos on Youtube where we go more in depth on our Companion module. Watch it from here:
For remote control, Presentation Sync and Clicker Distributor, see the APS Hub user guide.
9. Control Google Chrome
APS can open and control web pages and web apps directly in Google Chrome — right alongside your PowerPoint presentations. This is especially useful for the kinds of web-based tools commonly used during events, conferences, and meetings, such as Google Slides, Mentimeter, and Kahoot. Instead of manually switching between applications, APS lets you manage everything from one place through the same remote commands used for your other presentation sources.
APS uses Google Chrome specifically because it is one of the few browsers officially supported by Google for services like Google Slides — ensuring that presentations and other web apps display and function correctly. For Google Slides in particular, APS goes a step further by offering special slide control, allowing you to navigate between slides remotely — just like you would with PowerPoint.
9.1 Controlling Google Chrome through the developer port
To control Chrome remotely, APS launches a dedicated instance of the browser with a developer port enabled. This is a built-in feature of Google Chrome that allows an external application to communicate directly with the browser — opening pages, switching between tabs, refreshing content, going fullscreen, and more — all without requiring any browser extensions or manual interaction from the user. In short, the developer port gives APS a reliable, direct line of communication with Chrome, allowing web pages and web apps to be controlled just as seamlessly as PowerPoint or any other presentation source.
This dedicated Chrome instance runs on its own separate profile, so it starts with a clean slate — no saved logins, bookmarks, or history from your personal browser carry over. Anything stored during an APS session can also be cleared independently.
APS opens Chrome with a separate profile for presentation control. Use the Chrome session opened by APS, and sign in there if the webpage requires it. Personal Chrome logins are not copied into that profile.
9.2 Control Google Chrome from the user-interface
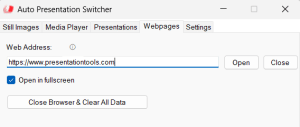
APS provides a Webpages tab in the main window where you can control Chrome directly.
To open a web page, type the URL into the address field and click Open. If the Open in fullscreen checkbox is ticked, the page will automatically go fullscreen when it opens. Close shuts down the APS-controlled browser session. You can also use Close Browser & Clear All Data to shut down the browser entirely and wipe any stored data such as cookies and login sessions.
You can also use the keyboard shortcut Ctrl + Up Arrow to put the active web page into fullscreen at any time.
The user interface and keyboard shortcuts are a convenient way to test that your web pages are loading correctly and to verify that APS can control Chrome as expected. However, in a production environment you would normally control web pages through network commands from Bitfocus Companion, which lets you build buttons for opening specific URLs, switching tabs, refreshing pages, and more — unlocking the full potential of APS’s Chrome control. This is covered in the next section.
9.3 Control webpages in APS from Bitfocus Companion
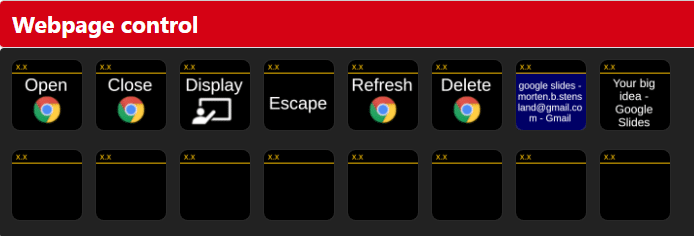
You can get most of the buttons you need for webpage-control from the presets in Companion, from the Webpage Control section. Here you can get similar commands as from the user-interface, along with more actions and feedback like changing tabs on the web-window.
9.4 Open web-pages
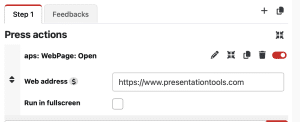
The “Open” button will open a URL in a similar way as the equivalent button in the UI, see 9.2 for more explanation.
9.5 Control web-tabs
You can control the web-tabs you have created with the “Webpage tab” buttons found in the presets. Note that the first time you find them in the presets, they will probably look empty, but by hovering over the buttons, you can see their names.
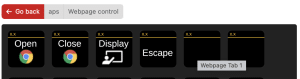
When you drag the buttons to a Companion page, then they will show the name of the webpage of the tab. For Google Slides and Slido presentations, these names will be the name of the presentation displayed. Note that the tabs will be sorted alphabetically, not in the order they are shown in the webpage.
The tab in blue is the currently selected tab. To change the currently selected tab, simply push the buttons.
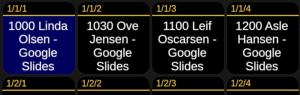
By default, Companion displays the webpage title on each button — the same text you see in the browser tab. This makes it easier to recognize content like a Google Slides presentation or a Slido poll during a live show.
However, if you prefer, you can choose to display the webpage URL instead.
🏷️ Webpage Title (Default)
The title is usually the name of the presentation or the content on the page.
✅ Easy to read
✅ Quickly shows what each tab contains
❗ May vary depending on the website
🌐 Webpage URL (Optional)
This is the actual link to the page (e.g. slides.google.com/…).
✅ More precise
✅ Useful for advanced setups or similar titles
❗ Harder to scan at a glance
9.6 Move the webpage window
The “Display” command will put the webpage in fullscreen on the external display, or the display you select as the “Main presenter screen” in the settings.
And to mirror this, the “Escape” command will put the web-window back to the main display.
Note that these commands are the same that are used for the presentations. They will react on the app that is in keyboard-focus: If you are controlling a PowerPoint presentation, they can put PowerPoint in fullscreen. So to use the “Display” and “Escape” commands to control the web-window, you first need to make sure that the web-window is the top application.
9.7 Multitask between PowerPoint and a webpage
To make sure that Google Chrome and PowerPoint are in window-focus, you can use the new buttons for application-control. This way, you can first select which application you want to control, and then use the “Fullscreen” and “Escape” buttons shown earlier. Or you can put a Chrome window and PowerPoint presentation in fullscreen on top of each other, and then use the application-buttons to switch what is shown to the audience. (see video)
If you haven’t already displayed the Chrome window in fullscreen behind the PowerPoint, you can use the “Display” command to move the window to the external display and then stack it on top of PowerPoint. By enabling “Seamless transitions” from the settings, the transition between PowerPoint and the Chrome window will be seamless.
You can also operate webpages from APS Hub’s Webpages tab, including opening URLs, switching tabs and controlling Google Slides.
9.8 Control Google Slides
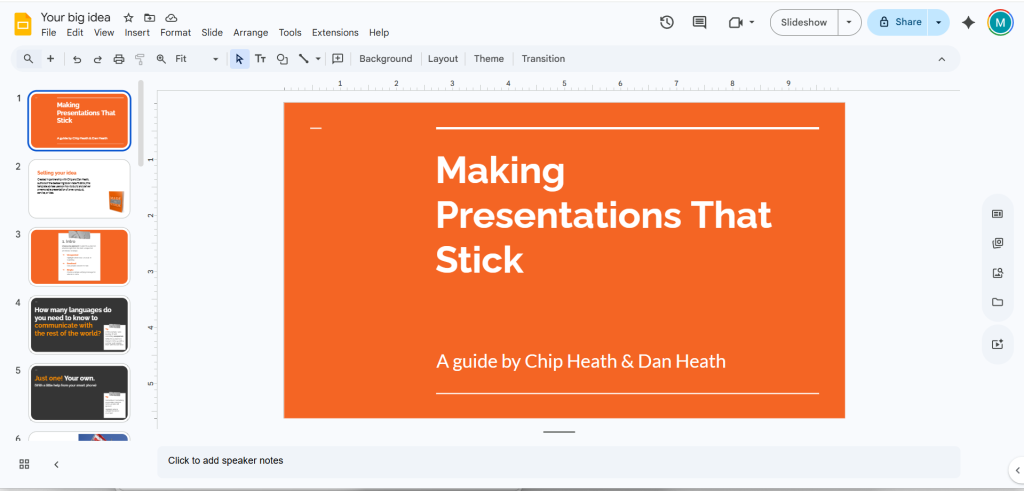
APS will detect that a Google slides presentation is displayed and act accordingly. There are no extra commands for Google Slides.
Fullscreen presentation
Through APS you can put Google Slides presentation in and out of fullscreen automatically: whenever APS detects that a Google Slides presentation is in edit-mode, then every command to take the presentation to fullscreen will take the presentation out of edit-mode (if necessary) and show the presentation in slideshow-mode. Likewise, if you exit a fullscreen presentation on the main presenter screen configured in the settings, then the presentation will go back to edit-mode.
The Tab-commands will also take Google Slides in and out of fullscreen automatically. This means that you can switch between Google Slides presentations, or go between Google Slides and a regular webpage, and APS will ensure that after the command is executed, the new presentation or webpage will stay on the correct display in fullscreen.
Slide info for Google Slides
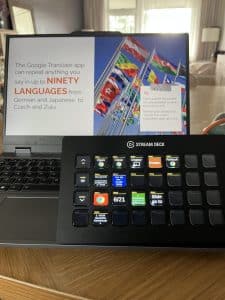
While a Google Slides presentation is displayed, APS will read slide-info from the webpage, and send current slide-number and total number of slides over the network-connection for listening devices like Bitfocus Companion. In Companion, this slide-info will be found with the variables
$(aps:slide_number)
$(aps:slides_count)
These variables are the same that is used for the other presentation-apps including PowerPoint and can be found in the Companion presets. This means that you can have the same Companion buttons showing slide-info regardless of which presentation-program you are working with.
You can also use the generic commands “go to slide number” to go to a specific slide while Google Slides is in slideshow-mode.
Google Slides Presenter View
In APS Settings, Use Presenter View opens the audience slideshow on the configured presentation screen and places presenter view on the other screen when available. With it disabled, APS uses a normal fullscreen browser page. Test the actual deck and display arrangement.
Compatible controllers can also report Google Slides animation steps. Feedback availability depends on the presentation and app state; an arbitrary webpage does not provide Google Slides feedback. See Hub’s slide and animation status reference.
9.9 Seamless switching with Google Chrome
If “Seamless switching” is on from the settings, then APS will try to smooth out the transition whenever APS wants to go in and out of fullscreen with Google Chrome, by placing a screenshot on top of the screen while the transition happens
The setting “Wait for fullscreen notification” from Google Chrome settings decides how long the screenshot will be displayed: Google Chrome has a fullscreen notification text that will display every time the web-browser goes to fullscreen, and it will last for about 5 seconds. If the setting is on, then the screenshot will cover this notification until it no longer displays. If you want a faster transition, then turn off this setting, and the new webpage will be revealed as soon as its ready, ignoring this fullscreen-notification text.
9.10 End the session and delete browsing data
When you control the Google Chrome web-window through APS, you use a custom APS user-profile. This means that the browsing-data used for this session is detached from your main Google Chrome profile. The first time you use this web-window, you will need to log in again, but it’s possible to keep the login if you close and re-open the window.
By keeping a separate profile, you can protect your private browsing-data from the web-content you display to an audience through the APS google chrome webpage.
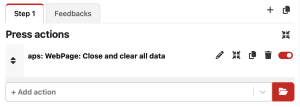
After the job is done, it’s a good idea to delete all data from the custom profile. This ensures that none of the login-info or browsing-history will be kept for the next job. You can do this with the APS command “Close and clear all data”.
10. APS API
You can also control APS over the network without Companion. Through our open API you can build applications that can interact with APS in different ways. Or you can control it directly from applications like Vmix.
The API is free for anyone to use.
Link to the public APS API
APS Hub is built on this API — see the Hub user guide.
11. More info
Troubleshooting
If a presentation cannot be opened, check that its local path still exists, cloud files are available offline and the required presentation app is installed. In Controlled mode, check the selected watched folder. Resolve application dialogs locally before testing from a remote controller.
If a shortcut fails, bring the supported presentation app to the front and check for another program using the same shortcut.
If slides advance twice, check for duplicate paths through the physical clicker, Companion and Hub’s Clicker Distributor. If remote control fails, compare the configured address, network selection, active control port and firewall. See Hub troubleshooting.
When contacting support, include APS version, operating system, presentation app, expected result, actual result and steps to reproduce it. Export the APS log when requested.
We also put some instructional-videos on our Youtube-channel
Contact: