

APS Hub
User Guide APS Hub
On this page User Guide APS Hub
0. Introduction
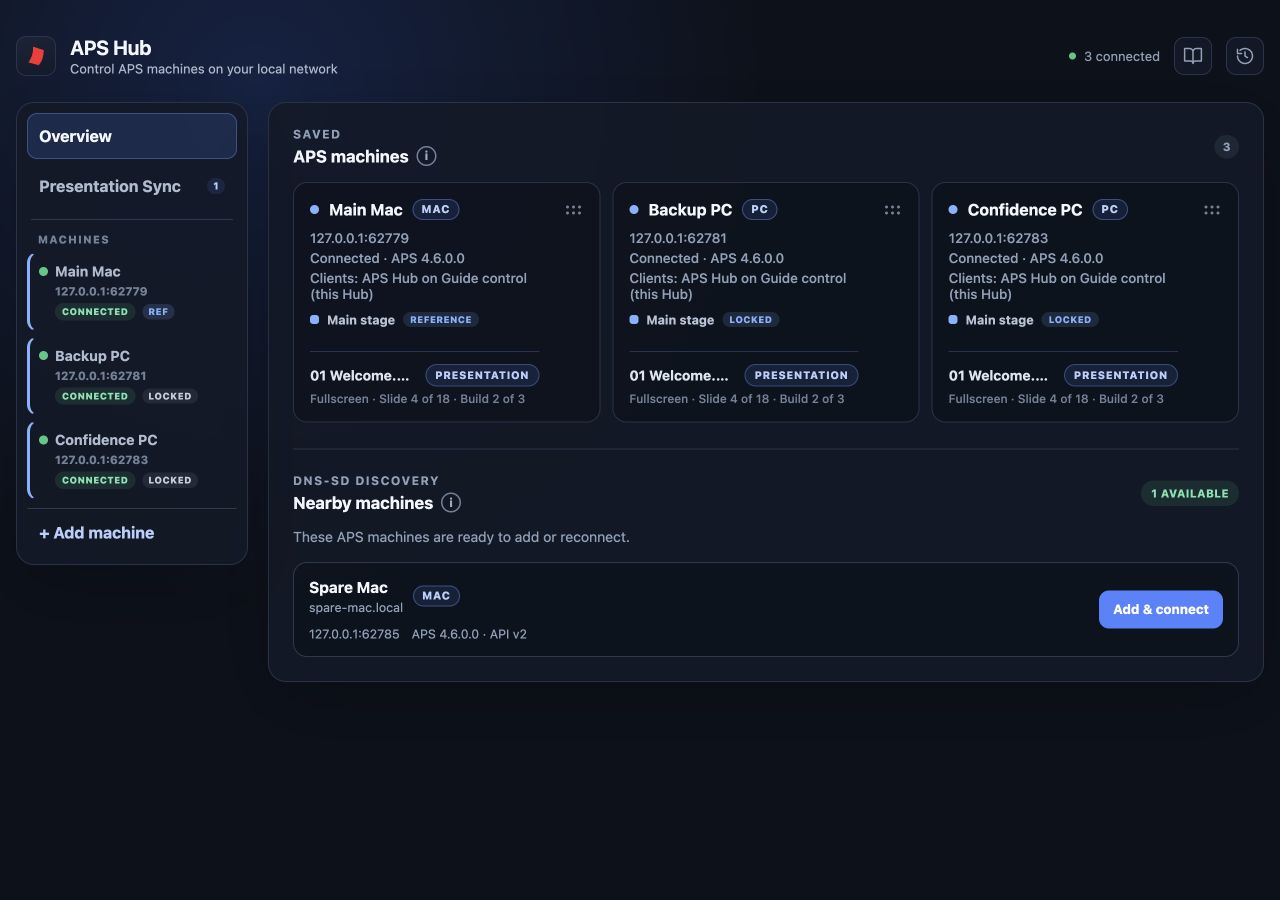
APS Hub is a free companion app for Auto Presentation Switcher. It lets you control one or more presentation computers over a local network. It brings machine status, presentation controls, media, and settings into one browser page, with file transfer, Presentation Sync, and Clicker Distributor for preparing content and coordinating computers.
APS Hub gives you an additional interface for day-to-day operation of APS. Many controls will be familiar from the APS desktop app, making it useful when a presentation computer is out of reach or its screen is already occupied by a presentation. Prepare files and folders on each APS computer: use Finder or File Explorer to organise the content, and the APS app to configure the folders you want to choose between. Hub provides selected file controls, but does not offer a general file browser for the remote computer. Keep using APS for local setup, permission grants, and APS updates, and handle general computer maintenance on that computer.
0.1. APS runs your presentations. APS Hub provides remote control.
A setup has three parts:
- The presentation computers run APS and the applications that display your content, such as PowerPoint or Keynote.
- The Hub computer runs the APS Hub desktop app. It maintains connections, coordinates groups, and receives clicker input when distribution is enabled. It can also be one of the APS presentation computers.
- The control page is the browser interface. Open it on the Hub computer or another device on the same network. The browser sends instructions to APS Hub; APS carries them out on the selected presentation computer.
APS Hub does not render the presentation, send a video feed to your screens, or operate your video switcher. Each computer continues to produce its own output.
0.2. Find your way through the guide
Start with installation and connections, then get to know the individual APS controls through Hub. These chapters also introduce the APS features used in the later workflows. If you already know APS, use the links below to go straight to the workflow you need:
- Operate an APS computer — inspect its status and use its presentation, still-image, media, webpage, and settings controls. Event history and troubleshooting help when something needs attention.
- File transfer — send content from your browser device to a selected APS computer.
- Presentation Sync — coordinate a reference presentation computer with locked computers, such as backups and confidence screens.
- Clicker Distributor — send assigned clicker actions to the computers in your groups.
1. Compatibility and requirements
1.1. Hub and APS versions
Install APS Hub on a Mac running macOS 13.5 or later, or a 64-bit Windows computer running Windows 10 or Windows 11. The Mac app supports Apple silicon and Intel. The installer includes the runtime Hub needs; no separate server software is required.
Use APS 4.5 or later on the presentation computers for basic control and Presentation Sync, and keep APS and Hub up to date together. Older APS installations may connect with fewer controls or less detailed feedback. Hub displays unavailable features according to the connected machine's capabilities.
APS Hub is free. Each presentation computer still needs APS and the appropriate APS licence, as well as the presentation applications and any licences those applications require. Installing Hub does not install or license PowerPoint, Keynote, or APS.
The folder-content verification, direct folder uploads, deletion and media-layering controls described in this guide require APS Hub 1.0.1 with APS for Mac 4.5 (57) or APS for Windows 4.5.0.2, or later updates. Content verification also requires a licensed APS installation.
Font checking, remote font installation and Restart PowerPoint require APS Hub 1.1 with APS 4.6 or later. The full font scan is available with APS for Mac. Use the operating-system requirements in the Mac guide or Windows guide for each presentation computer.
1.2. Network and browser
Connect Hub and the APS computers to the same reachable local network. A wired connection is useful for a fixed show setup. Wi-Fi works when the network allows devices to communicate with each other; guest networks often block this.
Use a current browser on the control device. A desktop browser gives the most room for machine tables and settings. A phone or tablet can open the same control-page address without installing Hub on that device.
The control page is intended for a trusted local network and has no user sign-in. Devices that can reach it can operate the connected machines. Choose Hub's network access in Hub settings and avoid exposing its ports to the public internet.
2. Installation and first start
2.1. Install the desktop app
Get APS Hub from the download page.
- Mac: open the downloaded disk image, copy APS Hub to Applications, and launch it.
- Windows: run the downloaded installer and launch APS Hub when installation finishes.
- Use Open Control Page in the welcome window or the Hub menu to open the browser interface.
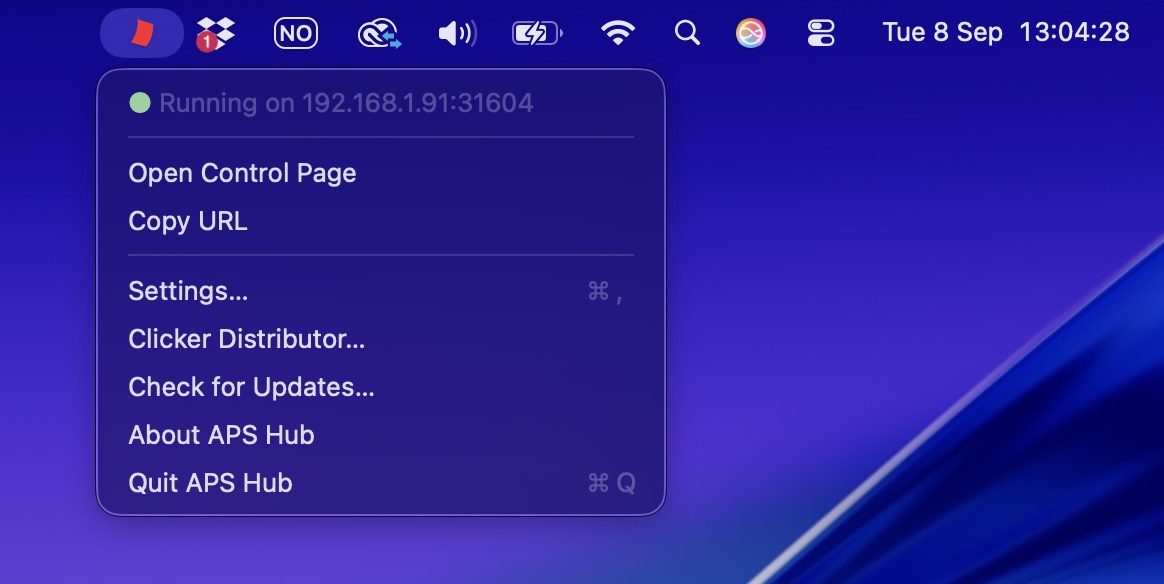
APS Hub runs in the background. To find it again, look for its red icon in the Mac menu bar or Windows system tray. Closing the welcome window or browser does not quit Hub.
Mac — look in the menu bar at the top of the screen. Hub does not appear in the Dock. Click the red APS Hub icon, then choose Open Control Page.
Windows — look in the system tray at the bottom right, near the clock. Hub's main icon lives here rather than among the usual taskbar app buttons. If you cannot see it, click the arrow beside the tray to show the hidden icons. Click or right-click the red APS Hub icon, then choose Open Control Page.
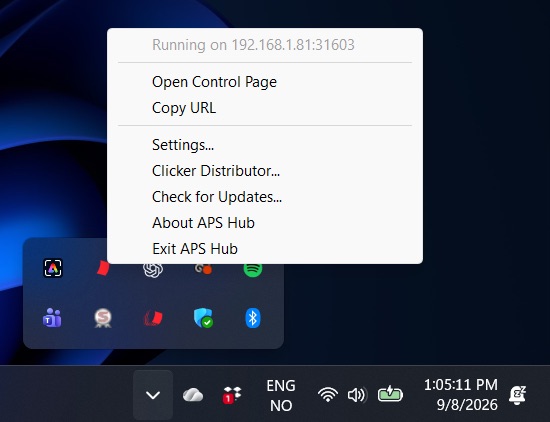
On both platforms, the same menu opens Settings and Clicker Distributor, and lets you check for updates. To stop Hub completely, choose Quit APS Hub on Mac or Exit APS Hub on Windows.
2.2. Prepare each APS computer
- Install and launch APS. Open the presentation application and clear any first-run dialogs.
- In APS's native settings, check its network address and Control API port. The default control port is 31600.
- Enable Make APS discoverable on network if you want Hub to find it automatically.
- Allow the needed local-network connections through the operating system's firewall.
- On Mac, grant APS the permissions required for the applications and output features you will use. App Permissions in Hub helps identify missing access.
- Open a test presentation locally and confirm that APS can operate it and use the intended output screen.
Incoming file transfers have their own APS setting and port. Enable them separately if you plan to upload content; see Prepare the file receiver.
2.3. Open the control page from another device
Use the Hub computer's reachable network address and its control-page port, normally 31603. For example, if the Hub computer is at 192.168.10.20, open http://192.168.10.20:31603/ on the other device. Use the address shown by your own Hub installation.
localhost and 127.0.0.1 always refer to the device running the browser. They work for Hub only when the browser is on the Hub computer. If Hub is set to local-only access, change its network setting before connecting from another device.
You can close the browser and reopen the page later. Hub's background connections and coordination continue while the desktop app runs. Quitting Hub ends those services; leaving an unattended browser tab open does not keep a quit Hub running.
3. Connect APS machines
3.1. Find and add a machine
Check the APS network settings: Mac instructions · Windows instructions.
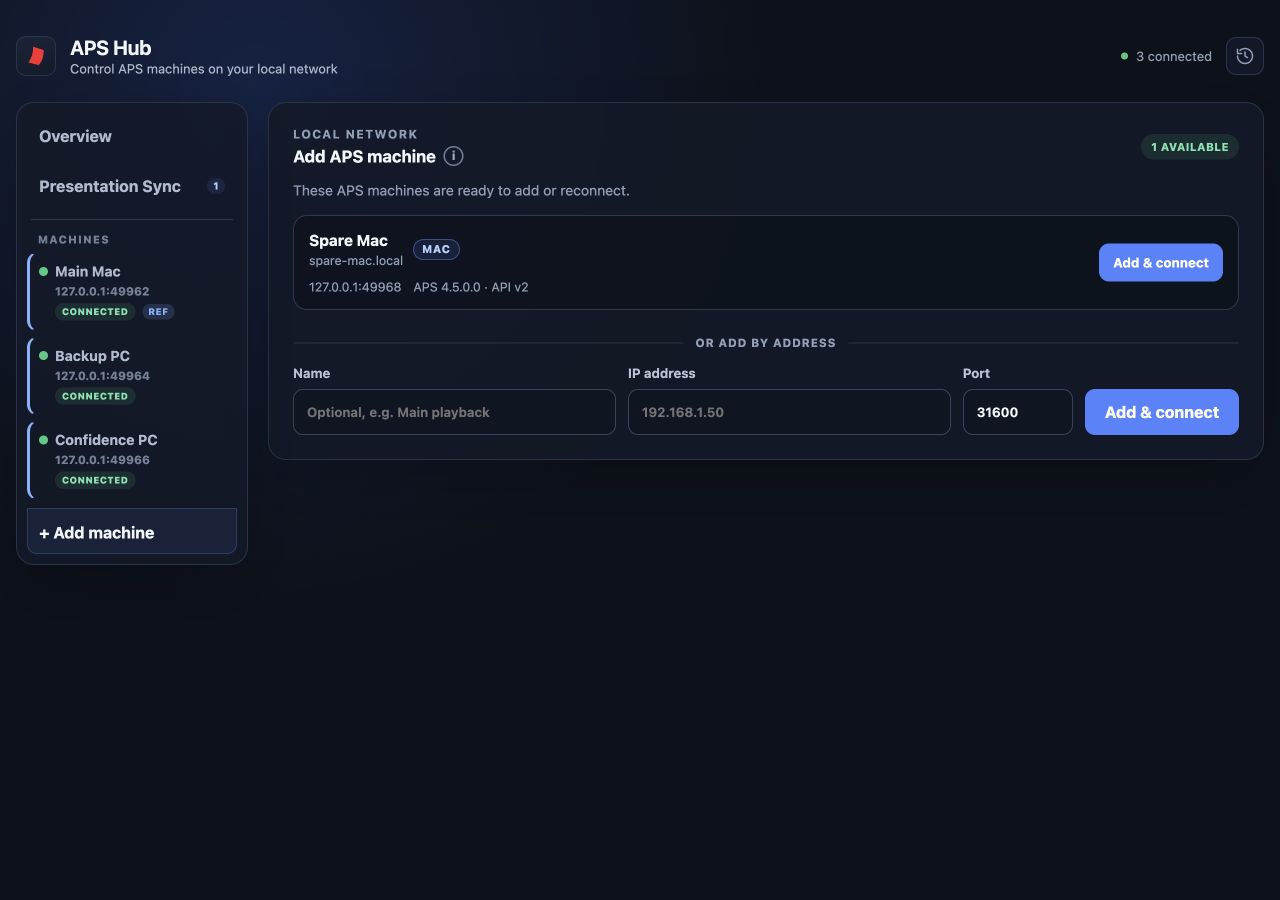
- Open the control page and choose Add machine.
- Find the required APS installation in the nearby machines list.
- Choose Add & connect.
- Wait for a connected status and check the name, platform, and presentation information.
- Repeat for the other presentation computers.
Discovery finds candidates; adding one saves it in Hub. Check that the address belongs to the computer you intend to control, especially when several installations have similar names.
3.2. Add a machine manually
If discovery does not find APS, use the manual form. Enter a useful name, the APS computer's IP address or reachable hostname, and its APS Control API port. Select Add & connect.
Use port 31600 unless you changed it in APS. Do not enter Hub's browser port, 31603, as the APS port. An address such as 127.0.0.1 is appropriate only when that APS instance runs on the Hub computer.
Manual entry is also useful when multicast discovery is blocked but direct network connections are allowed. It cannot overcome an unreachable address or a firewall that blocks APS.
3.3. Organise saved machines
Give machines names that describe their show roles, such as Main Mac, Backup PC, or Confidence. Reorder the saved machines using their drag handles so the navigation follows your operating layout.
Open a machine's actions menu to edit its saved details or inspect technical information. Disconnect keeps its saved entry but stops the connection. Connect starts it again, and Reconnect renews an existing connection. Disconnected entries can be collapsed to reduce clutter.
Remove removes the saved machine from Hub and its group membership. It does not uninstall APS or delete files on the presentation computer. Check the group first if the machine is its reference.
3.4. A machine's identity has changed
Hub records the identity reported by APS, as well as its address. A replacement computer or a different APS installation at a saved address can therefore need confirmation before normal control resumes.
Check the actual computer, its name, and its address. Accept the new identity only after confirming it is the intended replacement. Then verify presentation folders, slot assignments, permissions, and group membership before returning it to the show.
Hub shows identity warnings in machine navigation, Overview and Presentation Sync. Remote controls remain locked until the new identity is accepted on the machine page. If the reference needs review, its followers hold and the group receives no Clicker Distributor actions.
4. Overview and machine status
4.1. Navigate the control page
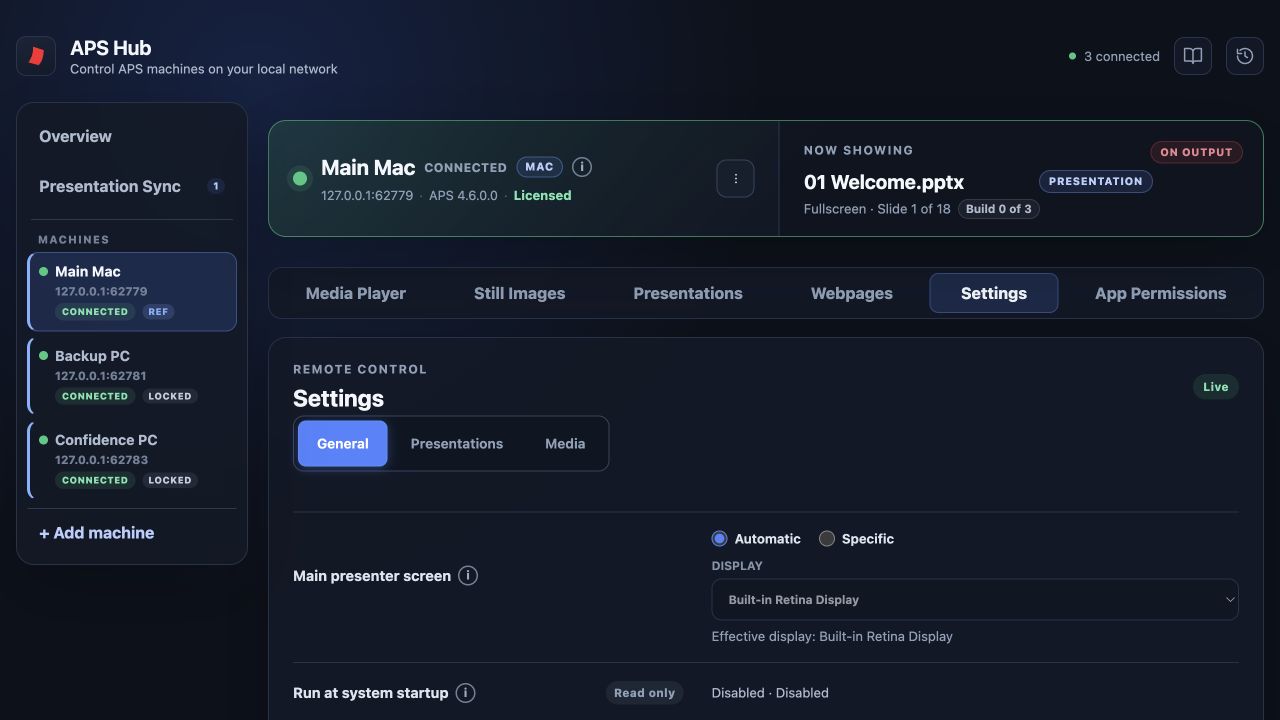
Selecting a connected machine gives you an additional interface for its day-to-day APS operation. The controls follow many of the same functions and settings as the APS desktop app, so you can prepare and operate that machine from Hub while its screen is in use or the computer is out of reach. Local setup and maintenance still belong on the APS computer.
Overview shows the saved machines and their current state. Presentation Sync opens the groups used for coordination. Selecting a machine opens controls that apply to that machine alone.
A machine opens on Media Player. Its tabs are Media Player, Still Images, Presentations, Webpages and Settings, followed by App Permissions on supported Macs. The available controls depend on that APS installation's platform, version, and capabilities.
The User Guide button in the header opens the guide bundled with APS Hub in a new browser tab. It is available offline.
Check the selected computer’s name before using its controls.
Machine navigation shows Locked and Paused roles and warns when a follower’s watched folder differs from the reference.
4.2. Connection and licence status
A connected status means Hub can communicate with APS. The machine can still need a licence, a permission, a presentation, or a corrected folder path. Read the status detail rather than treating a connection indicator as a complete readiness check.
Licence information belongs to the remote APS installation. Resolve a licence issue on that computer. Restarting Hub does not activate an APS licence.
4.3. Read Now showing and output layers
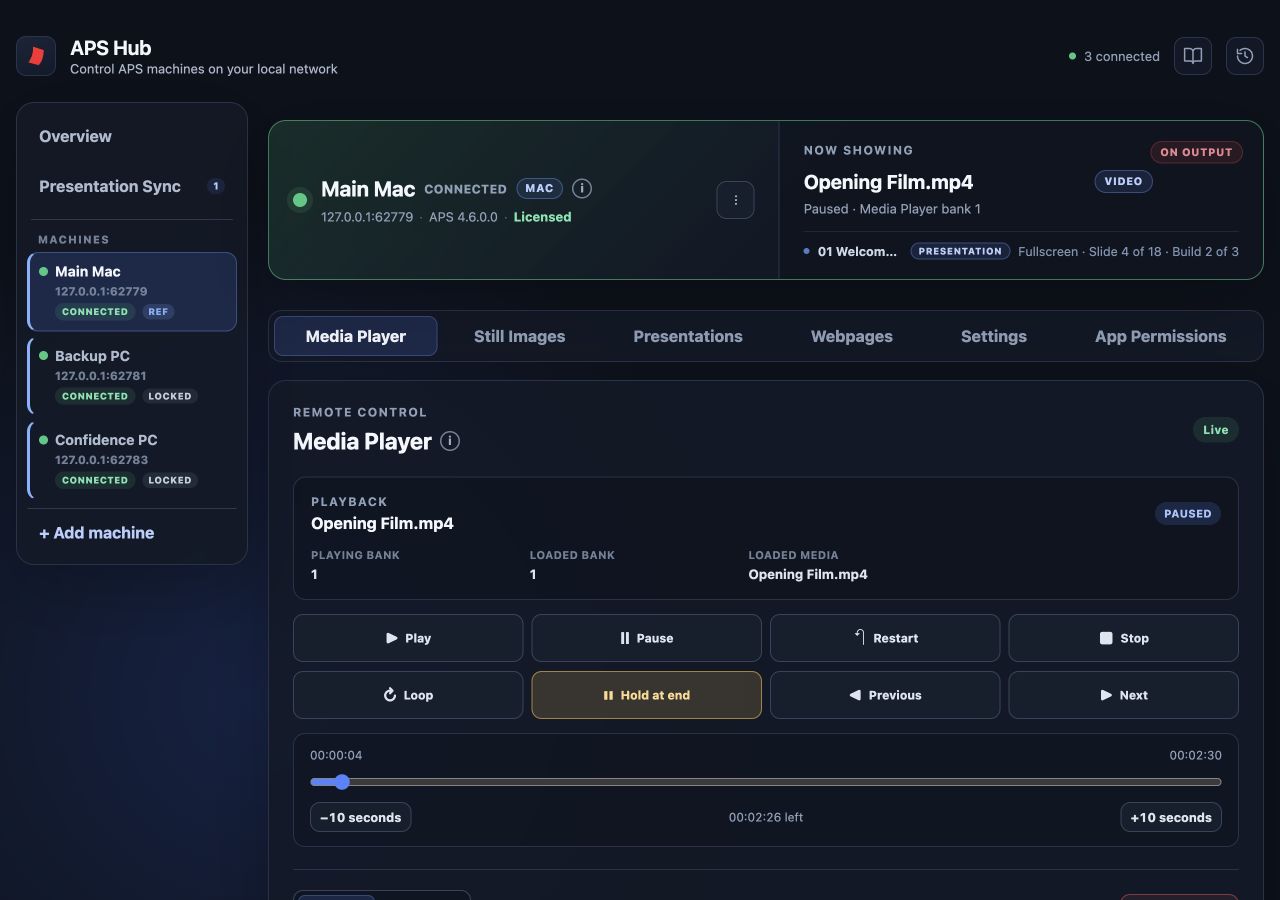
The Now showing area summarises the selected machine's output. Underlying output layers appear directly beneath the top layer, with presentation position and media playback details where available.
With Keep media player above still images turned off, Hub uses reported output changes to follow which media or still-image output was brought forward most recently. Check the actual screen, especially after connecting, because APS does not report every window-order change.
A presentation can remain open underneath a different output. For example, a holding image can cover the slide without closing the deck. Check the layer information before assuming that an unchanged slide number means the audience is looking at that slide.
5. Presentations
5.1. Open a presentation slot
Set up presentation slots in APS: Mac instructions · Windows instructions.
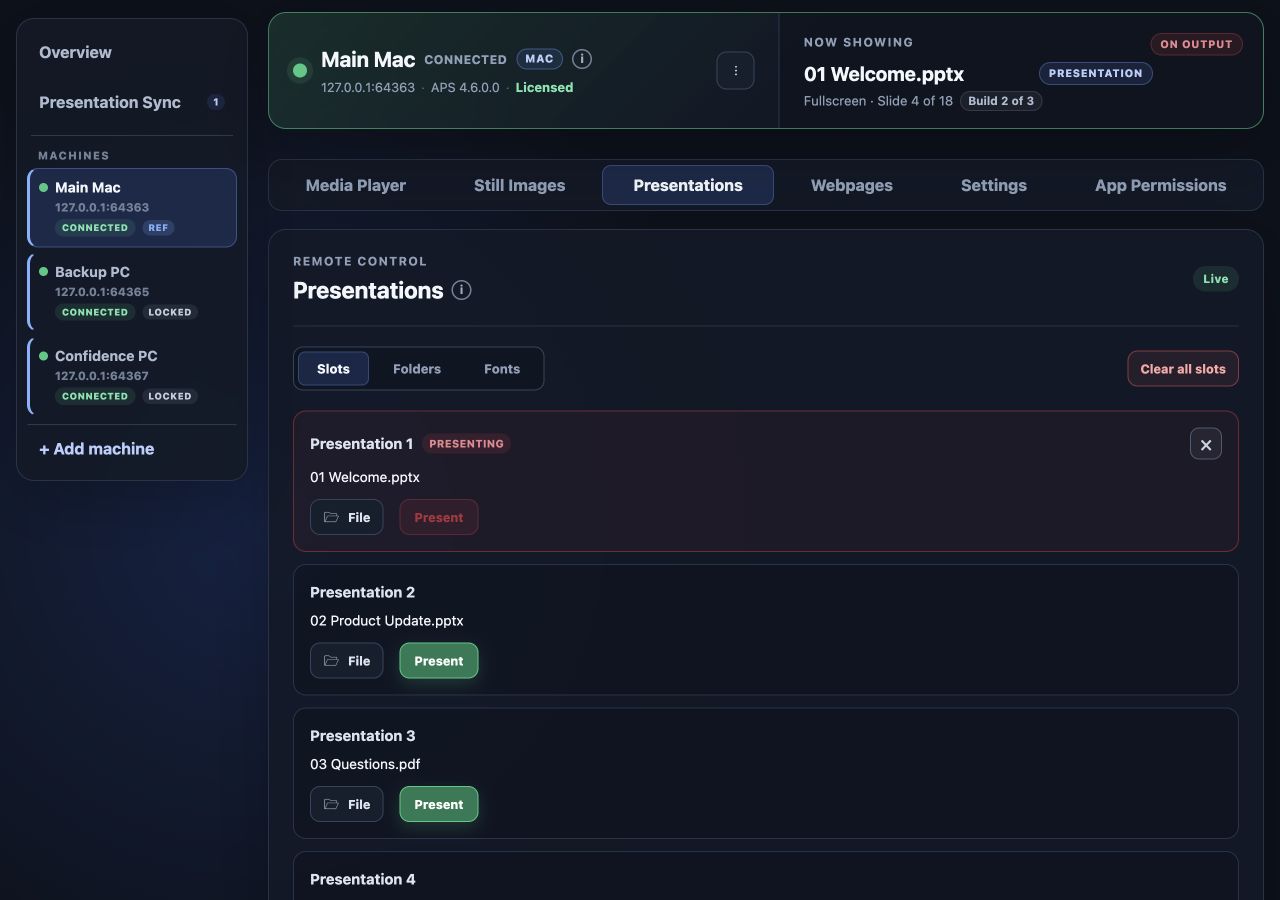
Select a machine and open Presentations. APS provides 40 presentation slots. Each slot is an assignment to a file on that presentation computer.
- Choose File beside the slot you want to use.
- Select a file from the watched folder, upload one, or enter a path on the APS computer.
- Confirm the assignment and check the displayed filename.
- Choose Present to start the presentation in full screen from slide 1.
5.2. Set up and watch a presentation folder
Configure watched folders in APS: Mac instructions · Windows instructions.
APS can store up to 20 presentation-folder positions. A watched folder supplies the presentation file list used by the slot chooser.
For initial setup, it is usually easiest to configure these folders in the APS app on each presentation computer. You can choose folders using that computer’s file browser instead of typing remote paths into Hub. Configure the folders you expect to switch between, and select the one APS should watch.
- On the APS computer, use Finder or File Explorer to organise the presentation files in the intended folders.
- In the APS app, assign those folders to presentation-folder positions and select the folder to watch.
- In Hub, select that computer and open Presentations → Folders. Use Manage folders when you want to switch to another configured folder; select the circle beside it.
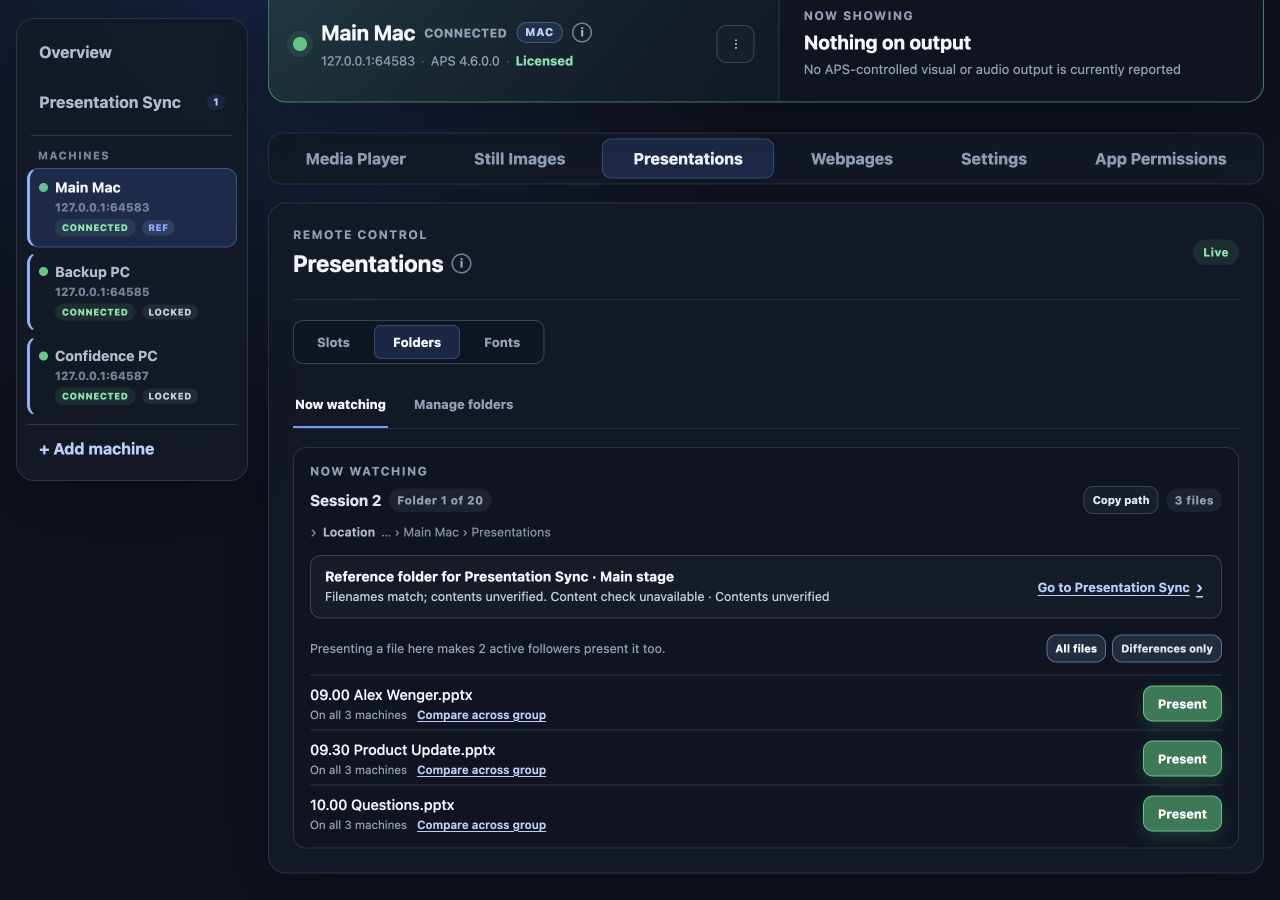
- Check Now watching to confirm the location and the files APS found.
If you already know the full folder path on the APS computer, you can also assign it from Hub: open Manage folders, choose a folder position, enter the Folder path, and choose Assign folder. This requires a compatible APS version. Hub’s path field does not browse the remote filesystem.
The path is on the remote APS computer, not on the browser device. For example, a Mac could use /Users/show/Presentations, while a PC uses C:\Shows\Presentations. Use the actual path on each computer. The Location and Copy path controls help inspect the saved location.
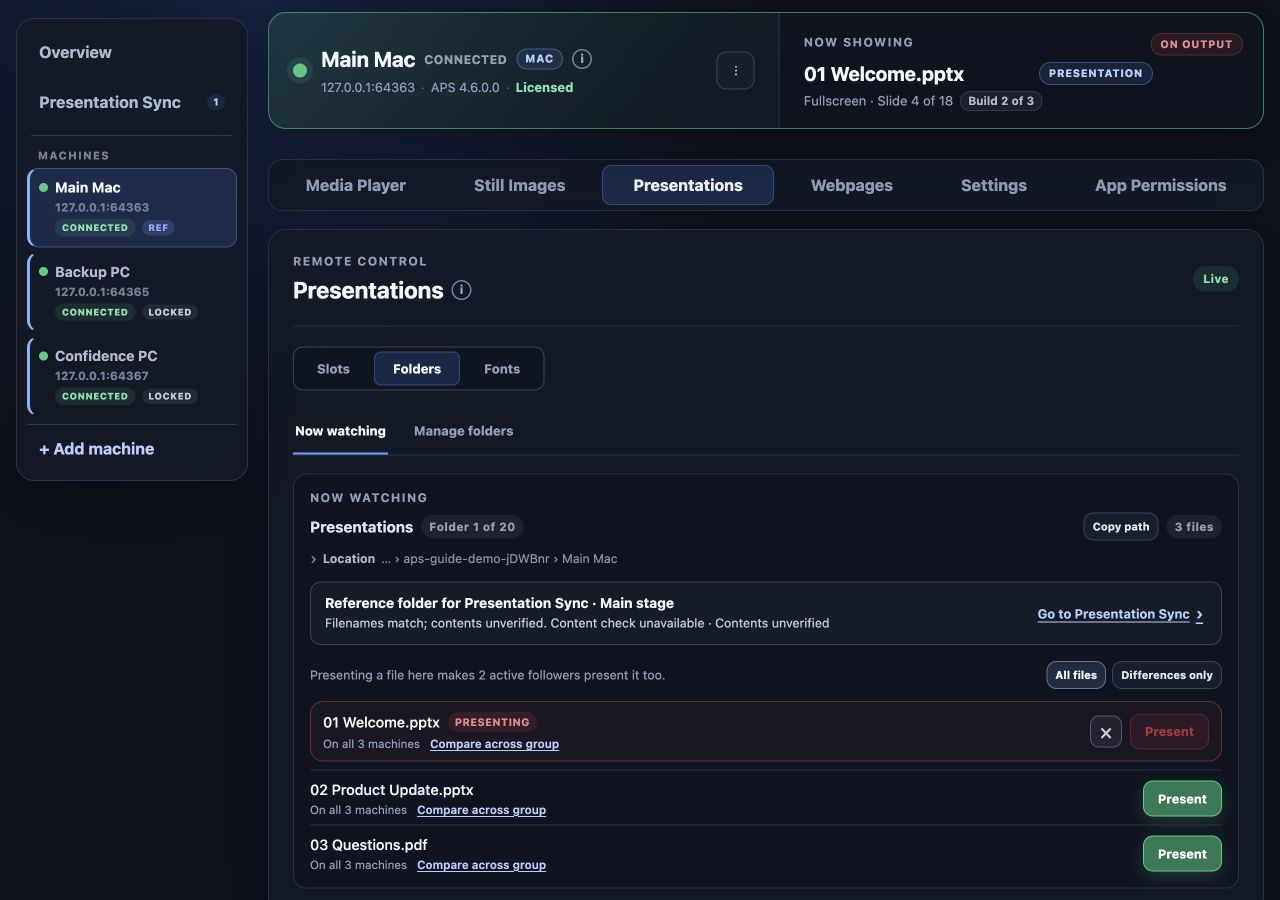
Watched folders also help Presentation Sync find matching presentations on the other computers in a group. See Prepare the content for Presentation Sync for the folder and filename requirements.
For a machine in Presentation Sync, the folder view also shows its role, the comparison with the reference and each file’s availability across the group. Use the link to open the group’s Control view.
In Manage folders, Add files… uploads files from the browser device directly into a configured presentation folder. Delete files… lists its eligible presentation files for review before moving selected files to Trash / Recycle Bin on that APS computer. Open or preparing presentations cannot be deleted. Restore deleted files on that computer if needed; folder-sync software may also remove them from other computers. These controls require support from the connected APS version. Keynote package directories are not upload or deletion targets.
5.3. Choose a file by list, upload, or path
You can assign presentation files directly in the APS app on the presentation computer. This is often easier when you need to browse for a file outside the watched folder. Hub’s File dialog provides three remote options:
- Watched folder: choose a file that APS already sees in its selected folder.
- Upload: choose a file from the device running the browser and transfer it to the selected APS installation. See File transfer.
- Path: enter the full path to an existing file on the APS computer.
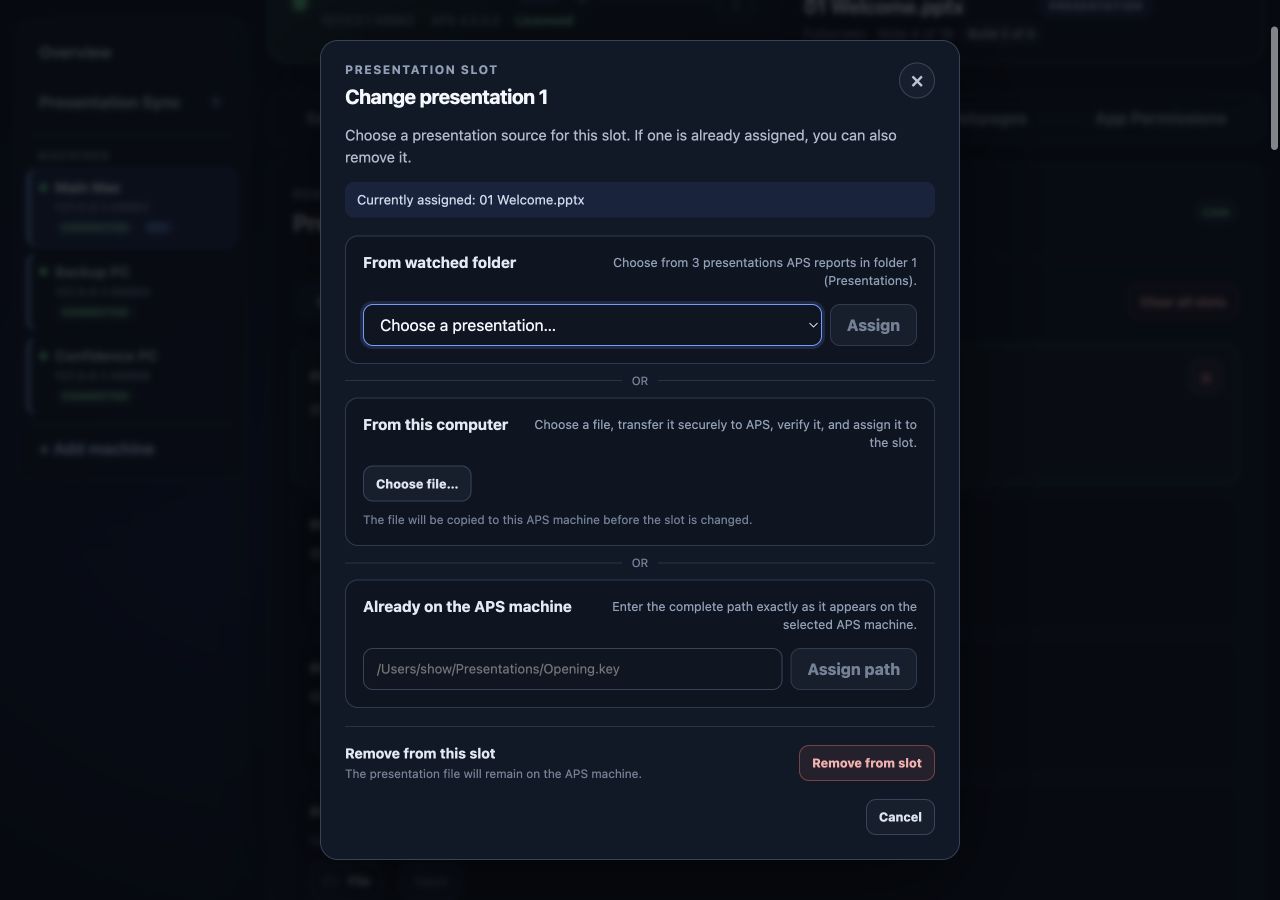
Assigning a file prepares the slot; it does not start the slideshow. Use Present when ready. A path copied from your own laptop is valid only if that same path exists and is accessible on the selected APS computer.
5.4. Navigate and end a presentation
Advance slides and builds using the presenter clicker, APS, the presentation application, or your configured controller. The current Hub browser Presentations tab provides slot assignment and Present/Exit controls; it does not have direct Next, Previous, or Go to slide buttons.
Use the exit control beside the open presentation to leave the slideshow. APS sends Escape to the presentation application. This does not delete the file and does not necessarily close its document window.
Use the clear control when you want to remove slot assignments. Clearing an assignment does not delete the file from the presentation computer. Confirm the selected machine and the scope of a clear action before applying it.
5.5. Check presentation fonts
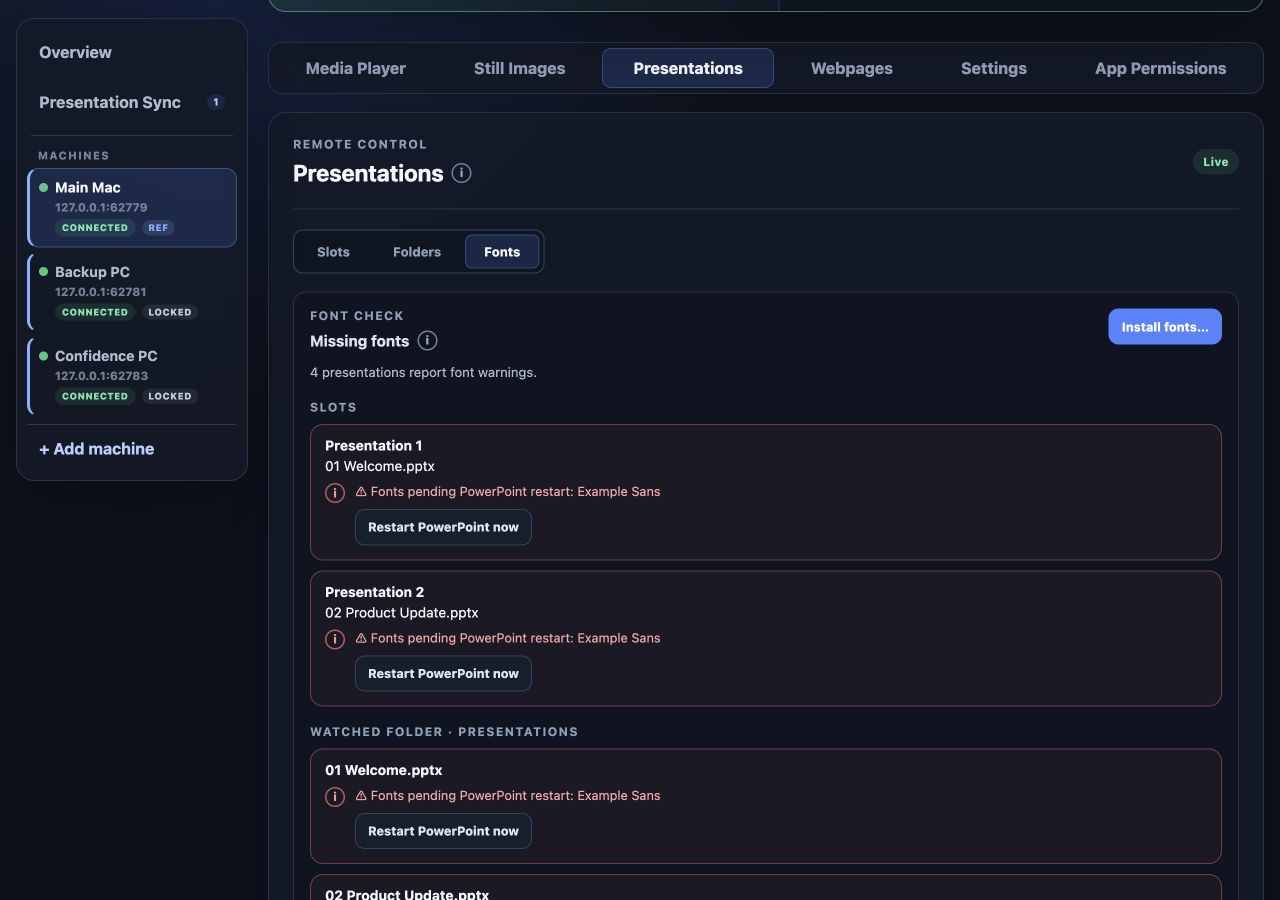
Select the computer and open Presentations → Fonts. Font checking is off by default. Turn on Check presentation fonts in Settings → Presentations, or choose Turn on font check in the Fonts view. Stop presenting or playing video before enabling it from Hub.
Hub shows the font observations APS reports for PowerPoint presentations on both platforms and Keynote presentations on Mac, in assigned slots and the watched folder. PDF and legacy .ppt/.pps files are not checked. Slots and folders show a short status and a View in Fonts link.
Select ⓘ beside a warning for its explanation. Red reports identify issues that can change the slides; amber reports include other warnings and incomplete checks. A pending or unavailable check is not a successful check. APS checks font references, not the final rendered slides, so review each presentation in its intended application.
On Mac, enabling font checking starts a full scan and may show a macOS permission prompt on the presentation computer. See Run a full font scan on Mac.
5.6. Install fonts on the selected computer
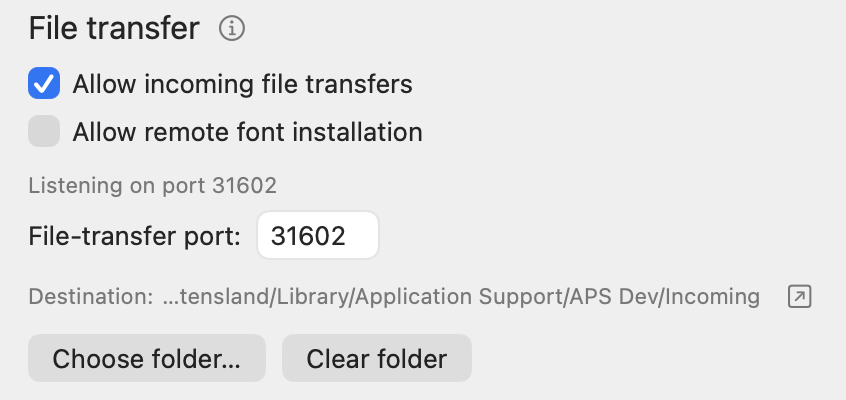
On the destination computer, open APS Settings → Network → File transfer and enable Allow incoming file transfers and Allow remote font installation. Remote font installation is off by default and can only be enabled in the APS app.
- In Hub, select the intended computer and open Presentations → Fonts.
- Choose Install fonts… and select standalone .ttf or .otf files.
- Check the destination, then choose Install.
- Read the result for every file.
Fonts are installed for the current user on that computer, independently of slots and folders. A conflicting installed font is not replaced. Open presentations may need to be reopened, or their presentation application restarted, before they use newly installed fonts.
5.7. Restart PowerPoint after installing fonts
If PowerPoint was already running when fonts became available, the Fonts view can report PowerPoint restart needed. Save all presentations and exit every slide show, then choose Restart PowerPoint now and confirm.
APS checks for unsaved changes and a running slide show before restarting PowerPoint and reopening saved presentations for editing. Read Hub's result and reopen any presentation it says could not be reopened automatically. On Mac, slideshow-format files (.pps, .ppsx and .ppsm) must be reopened manually using PowerPoint’s File → Open.
5.8. Run a full font scan on Mac
With a compatible APS Mac selected, choose Run a full font scan at the bottom of Fonts to include additional font locations such as Office cloud fonts. The scan reads available fonts; it does not download them. Someone at the presentation Mac must accept any macOS permission prompt.
The scan is unavailable while a presentation or Media Player video is showing. If access was denied, use Restart APS and Scan when offered, then choose Allow on the presentation Mac. APS restarts and Hub disconnects briefly. Read the result; a cancelled or incomplete scan leaves some fonts unchecked.
6. Still images, blackout, and freeze
6.1. Prepare image banks
Still-image controls and shortcuts in APS: Mac instructions · Windows instructions.
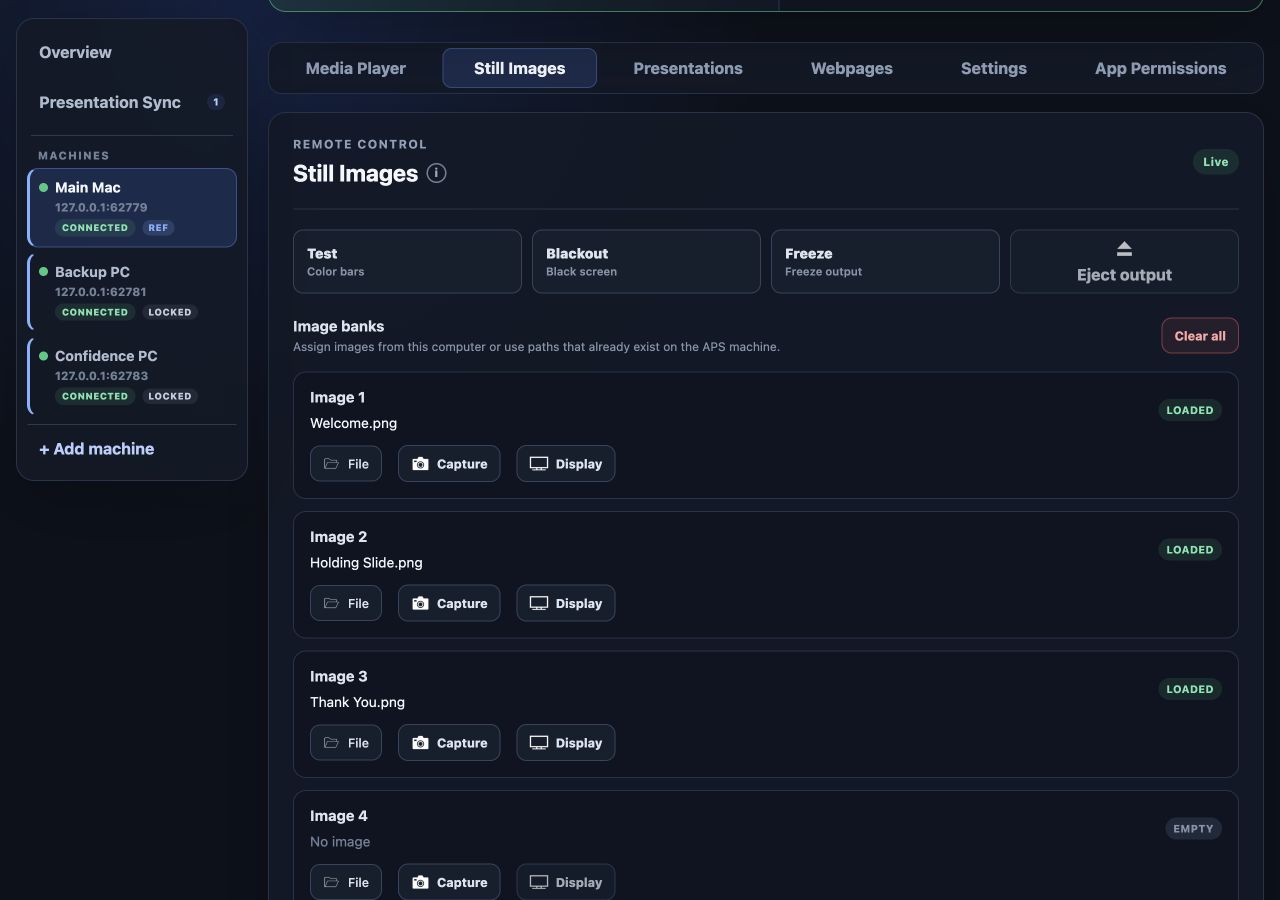
Select a machine and open Still Images. APS provides 10 image banks for holding slides, logos, and other prepared images.
Choose File for a bank to upload an image or assign a path on the APS computer. Choose Capture to capture an image through APS on that presentation computer. Capture does not take a screenshot of your Hub browser; on Mac it may require APS's Screen Recording permission.
Check the bank name, then choose Display to show it. Assigning an image and displaying it are separate actions. The clear control removes assignments without deleting the original image files.
6.2. Use the output controls
Blackout covers the output with black. Freeze holds a captured view of the output. Test displays the built-in test pattern. Eject output dismisses the still-image output so the content beneath it can be seen again.
The APS setting for toggling images changes how repeated image actions behave. With toggling enabled, repeating an active image action can turn that output off; otherwise the action shows it again. If you need to remove the image explicitly, use Eject output and confirm the resulting state.
6.3. Transitions and group use
Where supported, choose Cut for an immediate image change or Fade with a duration from 0.10 to 5 seconds. Still-image transitions are separate from media-player transitions.
Controls in this tab affect only the selected machine. To use an image action across a group, assign it in Clicker Distributor and prepare the same bank number on every member. Bank 1 on one computer does not automatically receive the image assigned to bank 1 on another.
7. Media Player
7.1. Assign and load media
Media Player controls in APS: Mac instructions · Windows instructions.
Select a machine and open Media Player. APS provides 40 media slots. Choose File to select available media, upload a file, or enter its path on the APS computer.
When media folders are configured, use the folder selector to choose their contents. Configure the folder paths in the native APS app if they need changing; the Hub presentation-folder manager is for presentation folders.
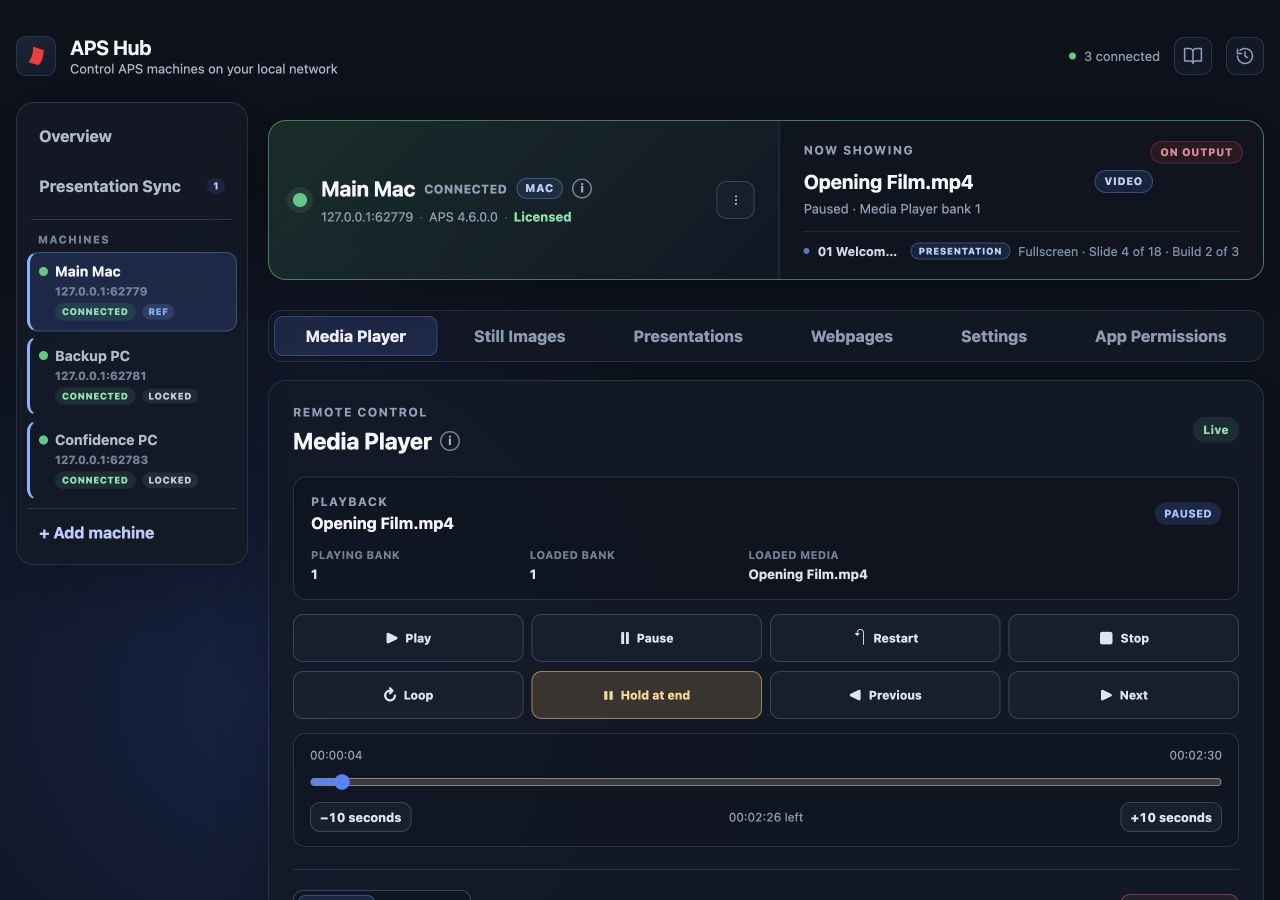
Choose Load beside a slot to prepare it for playback. Check the loaded filename before pressing Play. The loaded item and the currently playing item can differ when you prepare the next movie while another is on the output.
7.2. Control playback
- Play starts the loaded media.
- Pause pauses or resumes the current playback.
- Restart returns playback to the beginning.
- Stop stops the media output.
- Previous/Next select and load the neighbouring media item. Loading alone is not a command to start playback.
- Use the position control to seek when the connected APS media player supports it.
Watch the playback state and time information to confirm that the requested action took effect. If the output is covered by an image, inspect Now showing and its layers as well as the media tab.
The Keep media player above still images setting controls how visual media is layered with APS still images.
7.3. Loop, hold, and transitions
Enable Loop when the media should repeat. Enable Hold at end when it should remain on its final frame. For a predictable ending on either platform, disable Hold at end when using Loop, and disable Loop when using Hold at end.
Choose Cut or Fade for media transitions where supported. Fade duration ranges from 0.10 to 5 seconds. These settings are separate from still-image transition settings.
Test media on each target computer. An uploaded file can still depend on codec support, local playback settings, and the correct audio output. Presentation Sync does not provide frame-accurate media or audio synchronisation between machines.
8. Webpages
8.1. Open a webpage on the APS computer
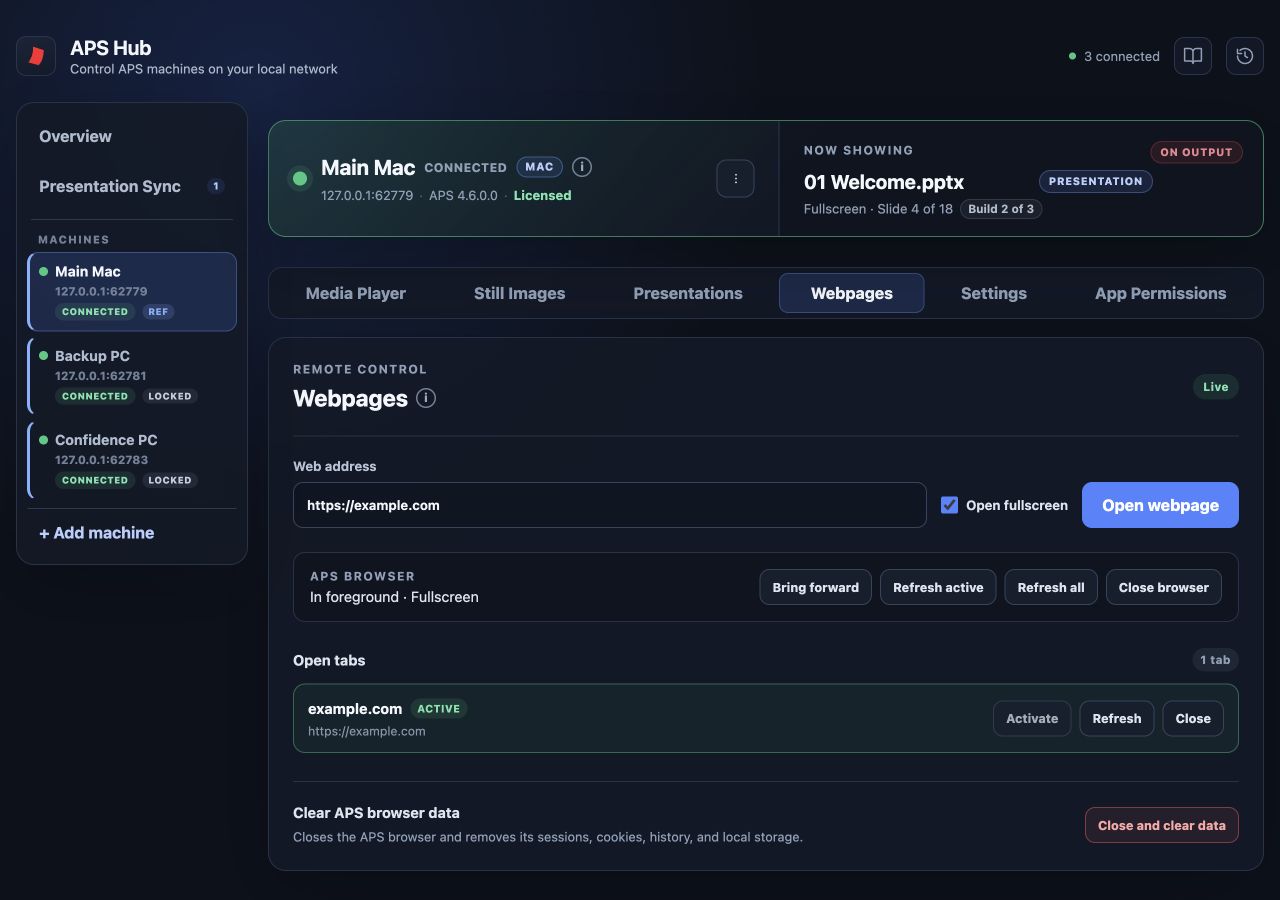
Select a machine and open Webpages. Enter the complete URL, including https://, choose whether to use full screen, and select Open.
The page opens through APS on the selected presentation computer. Your Hub browser remains the control page. Logins, cookie prompts, and page permissions belong to the remote browser and may need attention on that computer.
8.2. Manage browser tabs
Use Bring forward to bring the APS-controlled browser to the front. Refresh the active page or all pages when needed. In the tab list, use Activate, Refresh, or Close for an individual tab. Close browser closes the controlled browser.
Close and clear data also clears its stored browsing data, including sessions, cookies, history, and local storage. Read the confirmation before proceeding: sites may require you to sign in again. This affects the browser controlled by APS, not the browser in which you are reading Hub.
Opening an arbitrary webpage does not turn it into a Presentation Sync deck. Use the supported APS presentation workflow for Google Slides and verify its position feedback before relying on group alignment.
9. APS settings and permissions
9.1. Change settings on a selected APS machine
Open a machine's Settings tab to inspect and change the settings exposed by that APS installation. These are remote APS settings, so first check the selected computer's name.
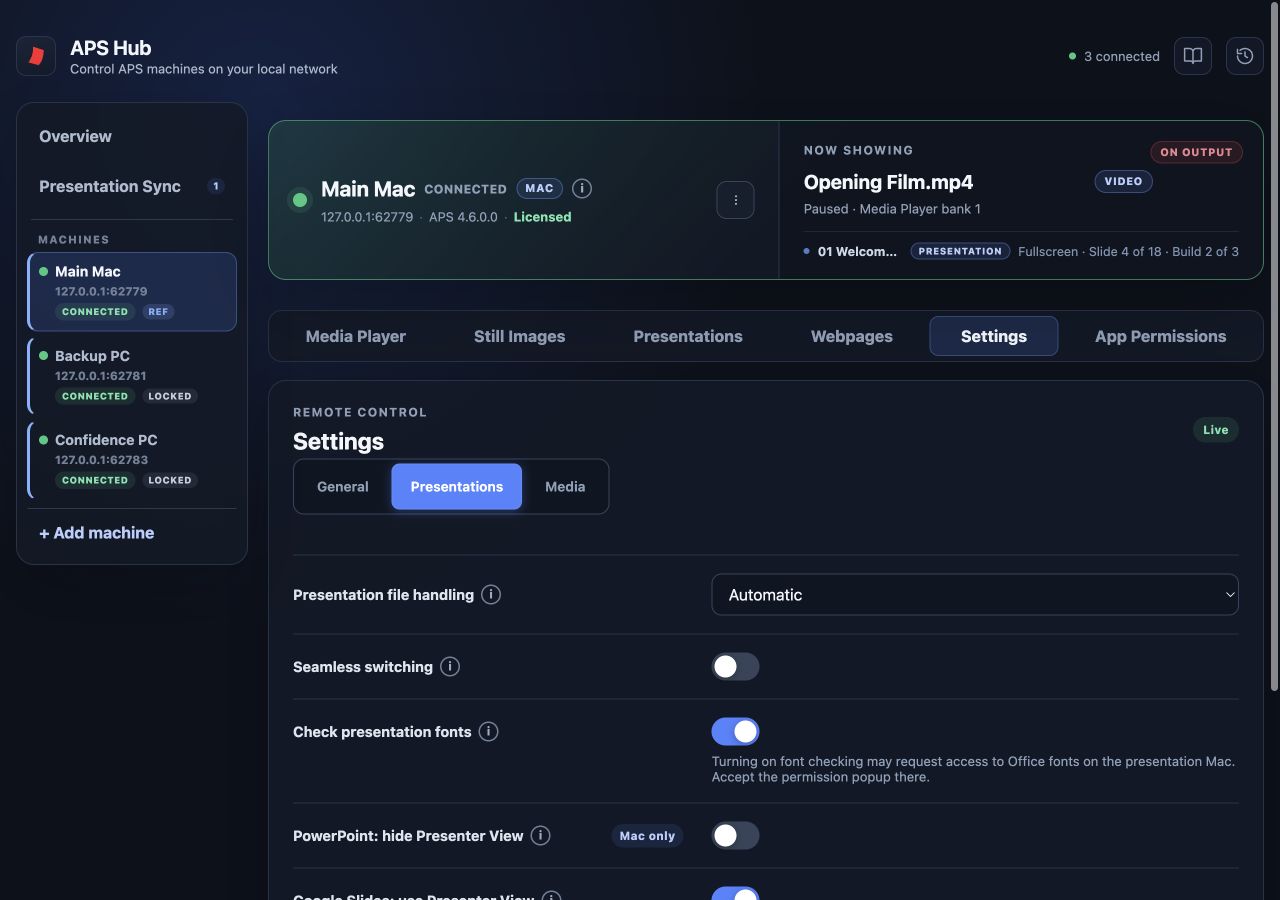
Remote settings are grouped into General, Presentations and Media. Network settings remain local to APS on the presentation computer.
Controls vary by platform and APS version. Change one setting at a time and check the confirmed value or resulting output. Disabled or informational fields cannot be changed from this page. If Hub reports a rejected change, resolve the cause instead of assuming the displayed selection has been applied.
9.2. Presentation and output behaviour
In Settings → General, use Main presenter screen to choose the screen used by APS for its image and media output, captures, and supported PDF workflows. Auto normally selects the extended screen; select one explicitly for more complex display layouts. Check PowerPoint and Keynote display settings separately and confirm every output on the physical screens.
In Settings → Presentations, Check presentation fonts controls the checks shown in Presentations → Fonts. It is off by default and applies to this computer only.
Presentation settings govern how APS operates the installed applications. Depending on the platform, these include switching behaviour, PowerPoint handling, and Mac-specific Google Slides or seamless PDF options. See the Mac settings or Windows settings for the detailed behaviour of each option.
Presentation file handling offers Automatic and Controlled modes. Automatic asks the presentation application for the active file path. Controlled matches the document name against the watched folder, making that folder the source for identifying and ordering presentations. If the document is missing from the watched folder, Controlled mode cannot resolve it.
On Windows, Link presentations lets navigation at a deck boundary move to the next or previous presentation in the folder. PPT → Hold at end of presentation prevents an extra Next from exiting the slideshow; when linking is enabled, the hold applies at the end of the last presentation. Rehearse these options with your chosen applications. Image toggling, media looping, and media Hold at end are separate output settings.
These settings are not a group preset. Changing one computer does not copy its configuration to the other members. Match the settings that matter to your show and test each computer's output.
In Settings → Media, Keep media player above still images keeps visual media output above APS still images, Freeze, Blackout and Test. When off, the most recently displayed APS output can appear above the other. The APS default is on for Mac and off for Windows; Hub shows the selected computer’s saved setting. The setting does not restart or seek playback.
9.3. Check Mac App Permissions
For local setup and restart guidance, see APS Mac permissions.
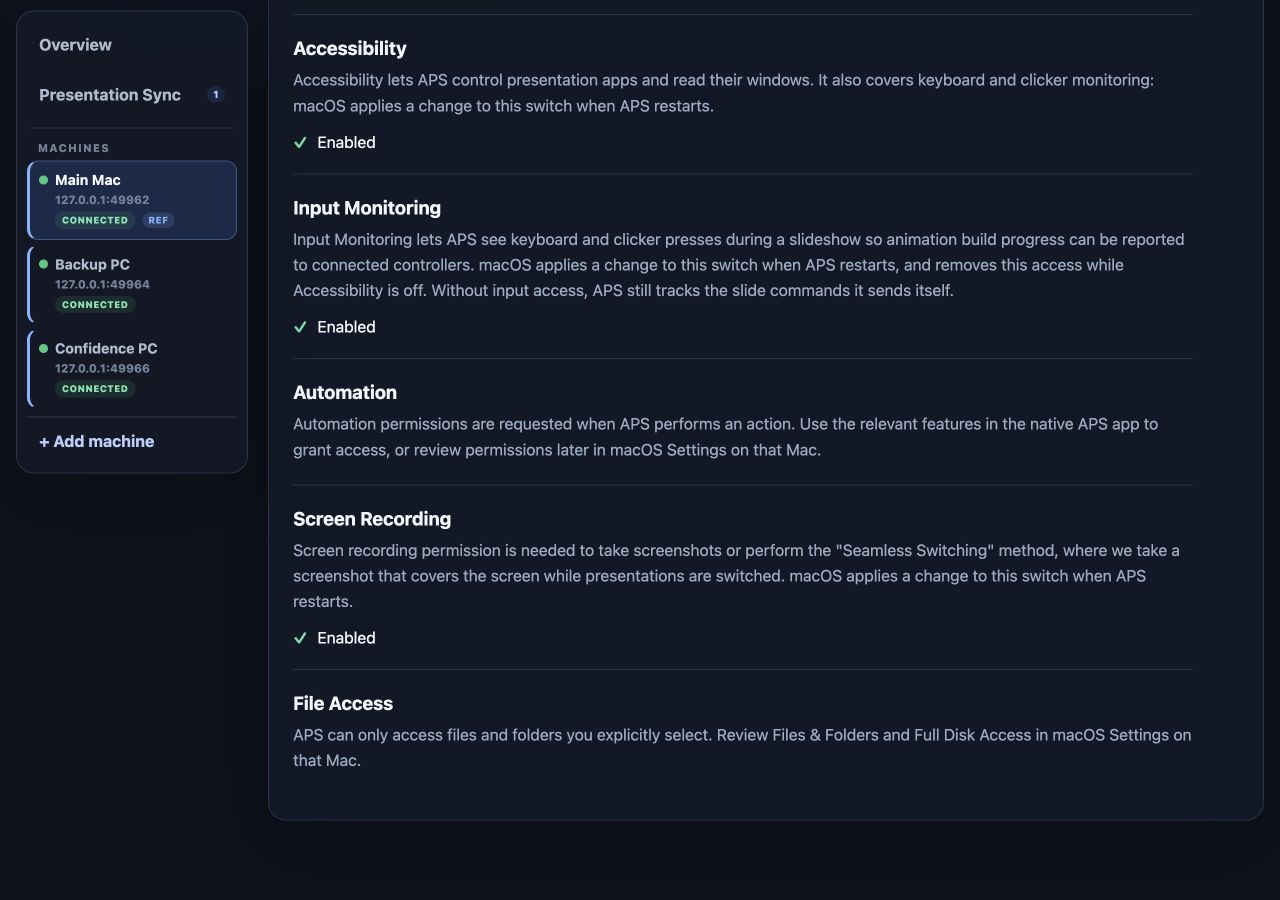
On a supported Mac, open App Permissions to inspect the access APS needs. The page reports status and guidance; the actual grants are made on that Mac, usually in System Settings or an application permission prompt.
| Permission | Why APS may need it |
|---|---|
| Accessibility | Control application interfaces and perform presentation actions. |
| Input Monitoring | Receive keyboard or clicker input used by APS itself. |
| Automation | Control another application, such as PowerPoint or Keynote. Access can differ for each target application. |
| Screen Recording | Capture the screen for features such as still-image capture or freeze. |
| File access | Read the presentation, image, and media locations used by APS. |
Font checking can separately ask for Office font-folder access on the Mac when enabled or when a full scan starts. See Run a full font scan on Mac.
Follow the page's explanation when system permission and effective access differ. A permission can be enabled in System Settings but still require APS to restart before it takes effect. For Automation, test the specific target application rather than assuming access to one app covers all of them.
When a restart is required, schedule it around the show and check the connections afterwards. Granting APS permission here does not grant Hub the Accessibility permission needed for its own Clicker Distributor.
10. File transfer
Hub can send a file from the device running the control-page browser to a selected APS computer. The file passes through Hub to APS's incoming-file receiver. Use this when a presentation, image, or media file is on your control laptop rather than already on the presentation computer.
For initial show preparation and general file management, work on the APS computers using Finder, File Explorer, or your usual file-copy or folder-sync tools. Create and organise folders there, copy complete show packages with their linked assets, and configure the folders in APS. Hub’s uploads and supported folder-deletion controls are useful for individual changes, but do not provide full remote filesystem access.
10.1. Prepare the file receiver
Configure the APS file receiver: Mac instructions · Windows instructions.
- On the destination computer, open APS Settings → Network → File transfer.
- Enable Allow incoming file transfers.
- Choose the destination folder and confirm APS can write to it.
- Check the file-transfer port, normally 31602, and allow the connection through the firewall.
- Return to Hub and confirm the destination machine is connected.
The file receiver is separate from the control connection. A machine can be controllable on port 31600 while incoming transfers are disabled or blocked on their own port. Use your installation's configured ports if you changed the defaults.
10.2. Transfer and assign a file
- In the selected machine's Presentations, Still Images, or Media Player tab, choose File for the target slot.
- Select the upload option and choose the source file using your browser's file chooser.
- Check the filename, destination machine, and target slot.
- Choose Transfer & assign and keep the page open while the transfer and assignment finish.
- Wait for the final result. A transfer reaching 100% is not by itself confirmation that the slot assignment succeeded.
- Check the slot's assigned filename, then open, display, or load it using the appropriate tab.
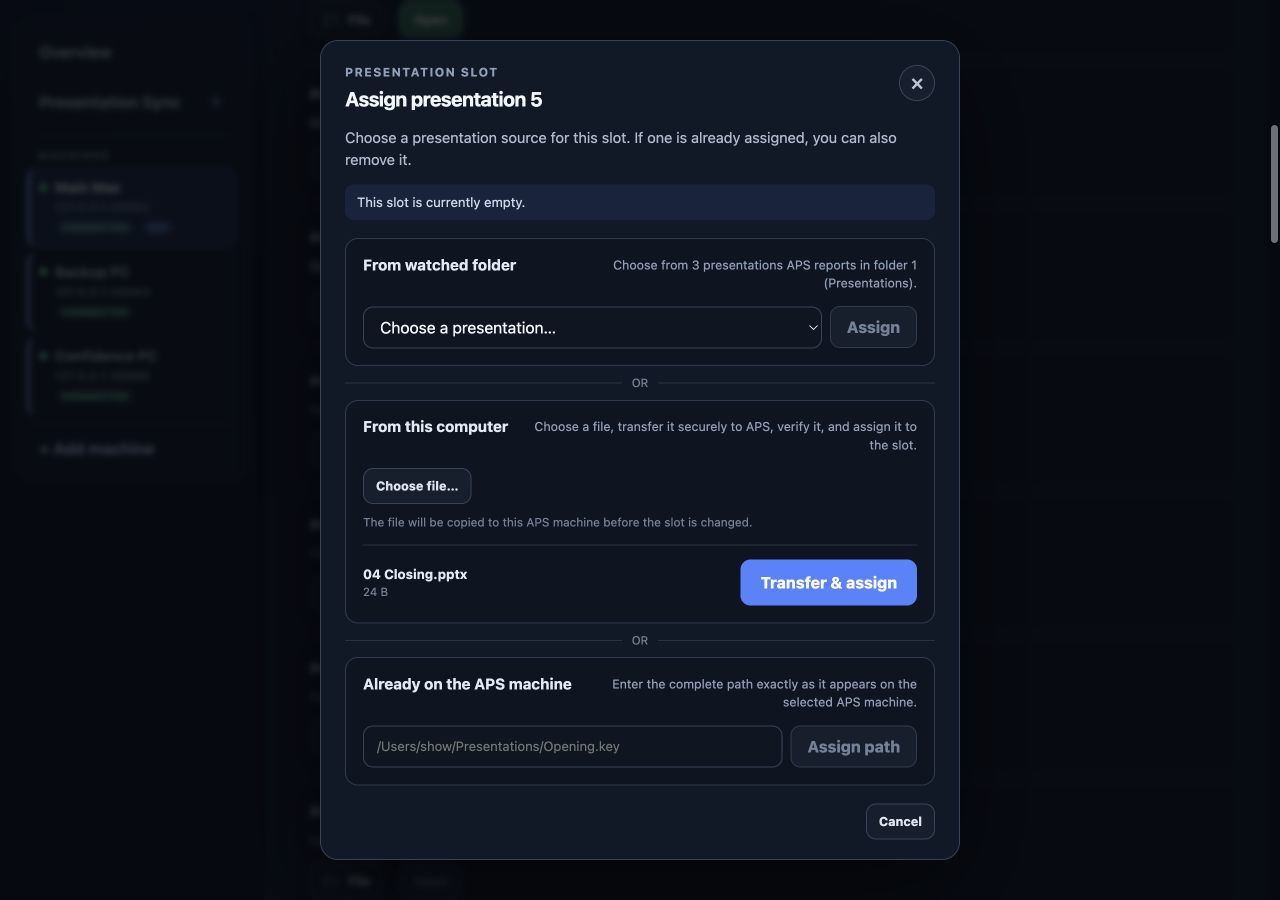
The chooser does not browse the remote APS filesystem. If the file already exists on the APS computer, use its path or the watched-folder list instead of uploading another copy.
10.3. Prepare matching content for a group
Uploading to one computer does not update the others. Transfer or copy the same files to all computers you intend to use in the group, then verify the filenames and the selected watched folders.
The slot-upload destination is not automatically the presentation folder currently being watched. If you upload a deck for use in a group, make sure it ends up directly inside the selected watched folder on each computer you intend to use.
The current slot-assignment dialogs upload individual files. For a complete folder tree, linked assets, or a large show package, use your usual file-copy or folder-sync workflow, then check the resulting folders in APS. Hub's presentation following is separate from continuous file synchronisation.
To upload directly into a configured presentation folder, open Presentations → Folders → Manage folders, choose Add files… beside the destination, select files and start the upload. If a filename already exists, choose Save as, Overwrite or Skip. APS protects open presentations from overwrite. Wait for the verified result and check the watched-folder list. Uploads affect only the selected computer and do not change which folder it watches.
10.4. If a transfer fails
Read the error before retrying. Check that the APS receiver is enabled, its port is reachable, the destination is writable, and there is enough space. Keep Hub running and the browser connected until the operation finishes.
If the file arrived but assignment failed, inspect the destination and assign the existing remote path where appropriate. If assignment succeeded but the file does not open, check the presentation application, format, and permissions on the APS computer. Successful transport does not prove the content will render correctly.
11. Presentation Sync
A Presentation Sync group is a set of APS computers that should follow the same presentation. Choose one computer as the reference; the other computers are locked to it. You operate the reference presentation, and Hub observes its state and opens, closes, or repositions locked computers when their reported state requires it.
11.1. Start with a working main and backup
- Install Hub and prepare APS on the presentation computers.
- Add and connect the machines in Hub.
- Put matching copies of the deck on each computer and watch the correct presentation folder.
- Create a Presentation Sync group and choose its reference computer.
- Open a presentation on the reference. Check the other members' status, slides, and physical outputs.
- If you want one clicker to drive the group, enable Clicker Distributor and rehearse the assigned keys.
The reference tells Hub which presentation and position the group should follow. Clicker Distributor sends the assigned actions to eligible group members. Presentation Sync then checks the reported positions and corrects locked computers when possible.
11.2. Prepare the content
Make sure the same files appear in the selected watched folder on all computers you intend to use in the group. Having the file elsewhere on the computer, or assigning it to a presentation slot, does not make it available in that watched-folder list.
- Copy the same version of each presentation to every computer you intend to use in the group.
- Use the same filename, including its extension. Matching ignores letter case, but
Welcome.pptxandWelcome.pdfare different presentations. - Place the files directly in the presentation folder you will watch on each computer.
- Use the APS app on each computer to configure and select its watched presentation folder. If the folders are already configured, you can also select one from Hub using Presentations → Folders → Manage folders. Check that the required filenames appear in the watched-folder list.
- Open the content locally once to check fonts, media, application dialogs, and display setup.
Folder paths can differ between computers. Hub uses the filename, including its extension, to find each computer's local copy in its selected watched folder.
In this example, Main Mac is watching Session 2. Make sure 09.00 Alex Wenger.pptx appears with the same filename in the watched folder on all computers you intend to use in the group. The folder names and paths do not have to match.
11.3. Create a group and choose its reference
- Open Presentation Sync → Setup and choose New group.
- Enter a descriptive group name, such as Main stage.
- Select the machines that belong together. A machine can belong to only one sync group at a time.
- Choose the reference machine. Use Choose later only when you deliberately want to leave the group without a reference.
- Choose a colour if useful, then choose Create group.
- Open a presentation on the reference and wait for the other members to follow.
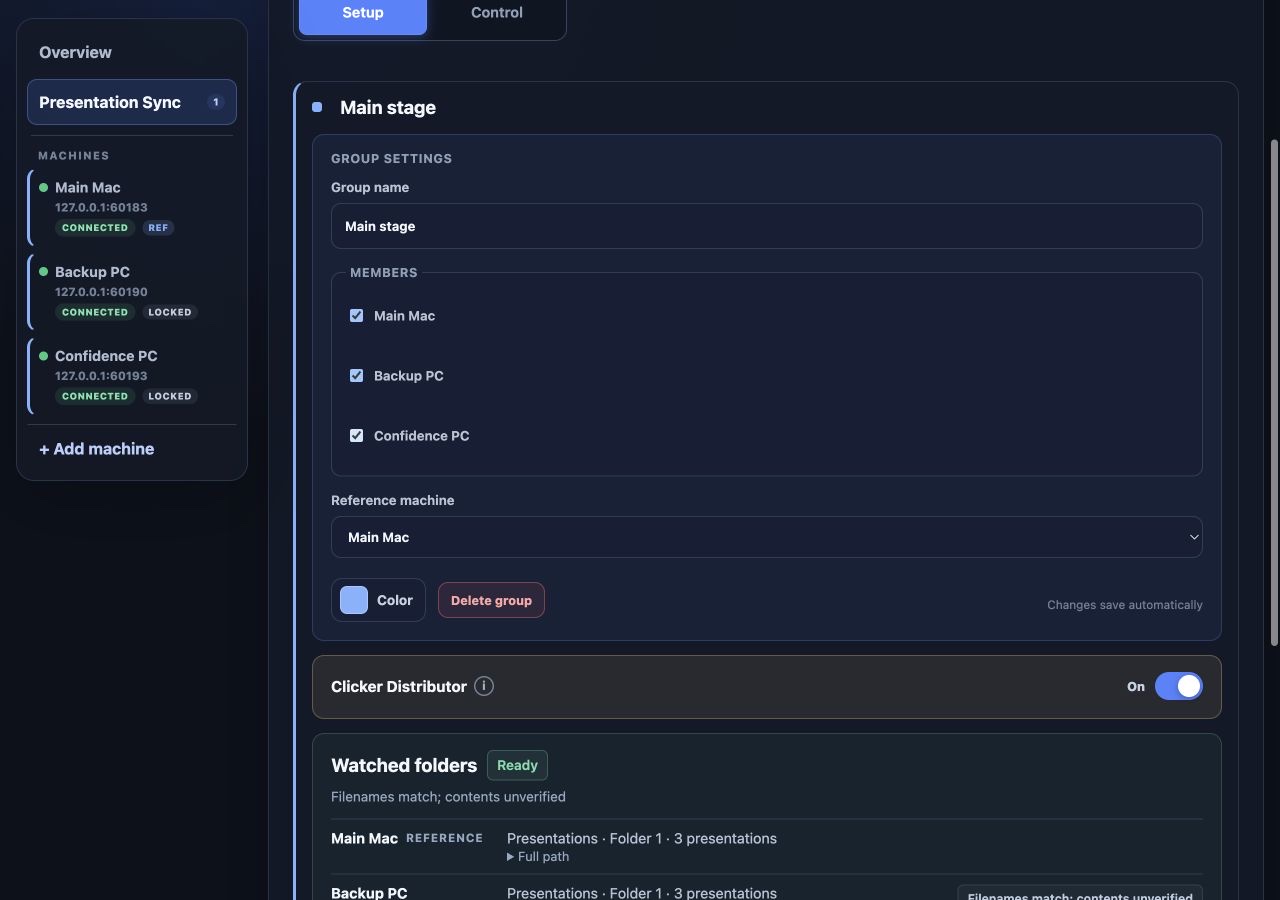
A group without a reference cannot align locked computers. Select one before expecting presentation following or enabling the group's clicker distribution.
Existing groups are edited directly on their Setup cards. Changes to the name, members, reference and colour are saved automatically. Setup also shows watched-folder issues and the group’s Clicker Distributor switch.
11.4. Run and monitor the group
Open Presentation Sync → Control, choose the group and select Present on reference beside the required presentation. You can also use Present in the reference’s presentation slots or watched-folder view, or operate its presentation application directly. Hub looks for the matching filename in each locked computer's selected watched folder.
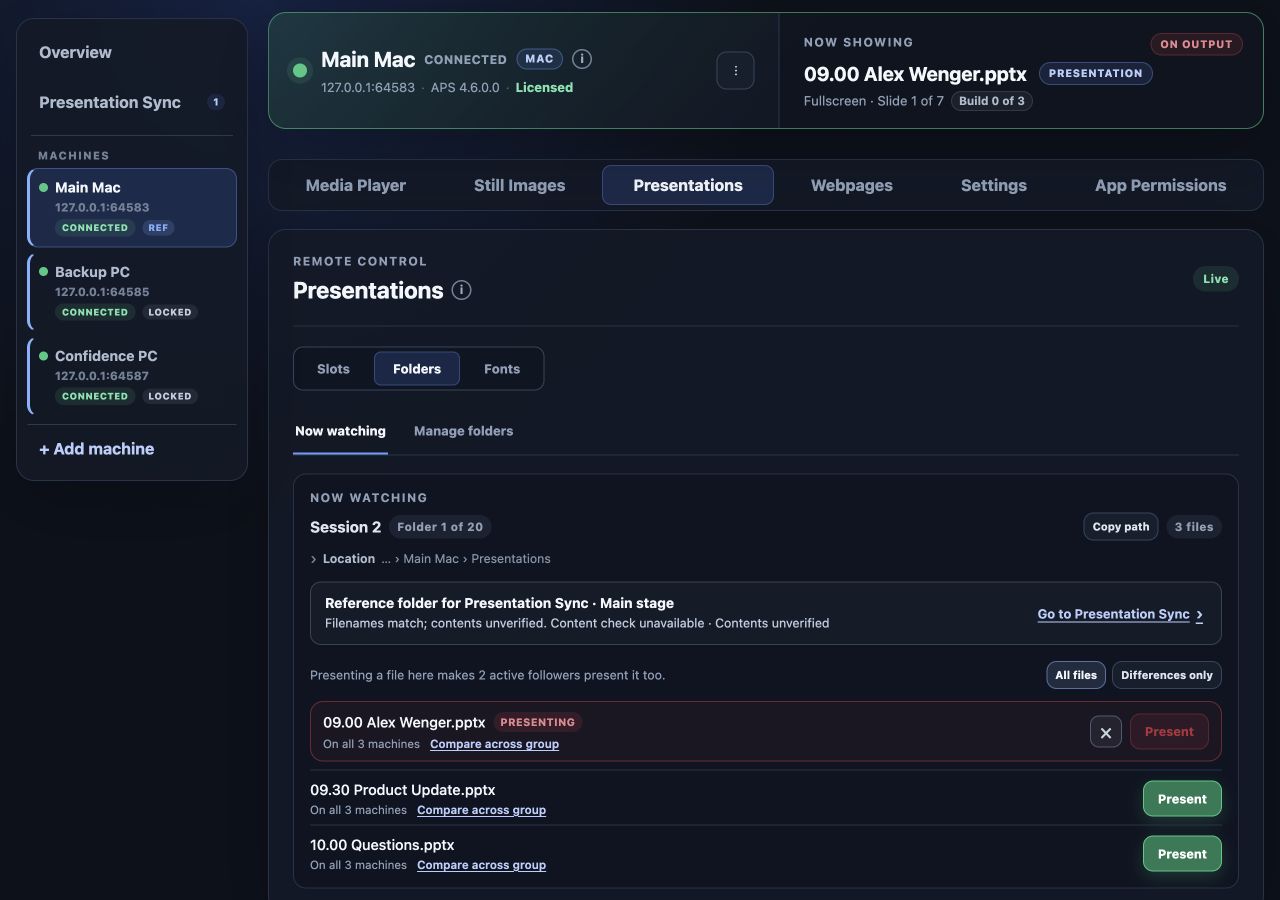
Check the group labels to identify the reference and locked computers. An active follower’s watched-folder Present on reference control starts the presentation on the reference. Other direct controls still apply to the selected computer and can conflict with active sync. Pause the locked computer first if you need to operate it independently.
Hub follows presentation changes as well as position changes. Switching decks on the reference can open the matching deck on locked computers; ending the reference presentation can close the locked computers' displayed presentations. Allow a short settling time after an action before interpreting a temporary checking or correcting state as a fault.
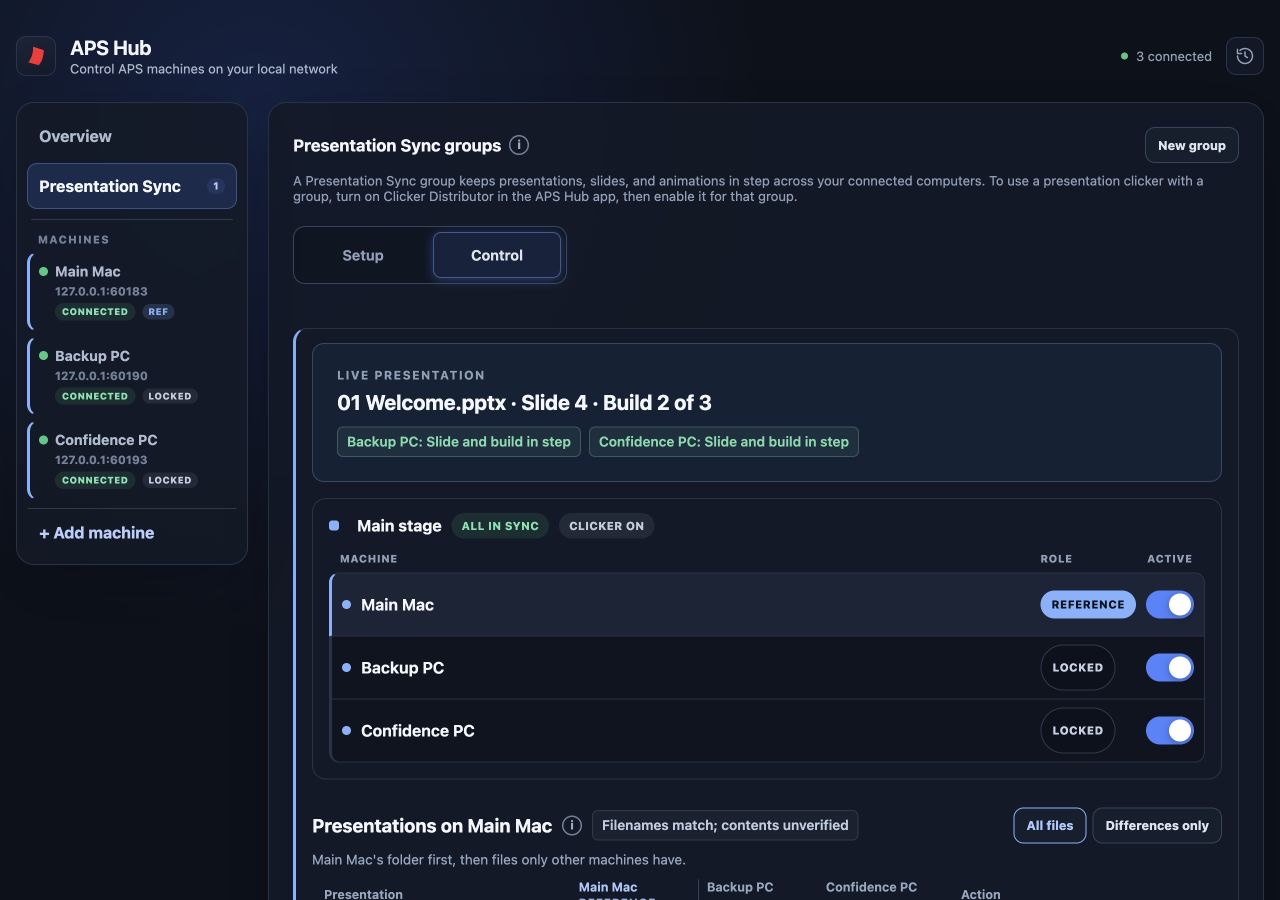
Clicker Distributor can send navigation to the eligible group members together, while sync checks their resulting positions. Presentation Sync does not distribute presentation files and does not synchronise video frames or sound playback between computers.
11.5. Presentations and mixed platforms
A group can contain both Mac and Windows machines. Each must be able to open its own copy of the content. A Keynote document still requires a Mac with Keynote; Hub does not convert it into a PowerPoint file for a PC.
| Content | What to expect |
|---|---|
| PowerPoint | Slide and build alignment when APS reports reliable build information. Rehearse animations on every platform. |
| Keynote | Mac only. Slide and build alignment depends on the feedback available from APS and Keynote. |
| Google Slides | Slide alignment where supported by the connected APS installation. Browser state and access to the presentation must be prepared locally. |
| Slide-only alignment. A locked computer showing a PDF can report Slide locked because there are no animation builds to match. |
Fonts, linked media, application versions, and operating-system differences can change the output even when the slide numbers match. Use the sync status reference to distinguish full position feedback from partial verification.
11.6. Understand the sync statuses
Locked in the role column means the computer is set to follow the reference. Read its sync status to see the level of alignment Hub can currently verify. Hover or focus the status indicator where available to read the reason for a warning. A healthy summary does not always mean that every animation build is verified.
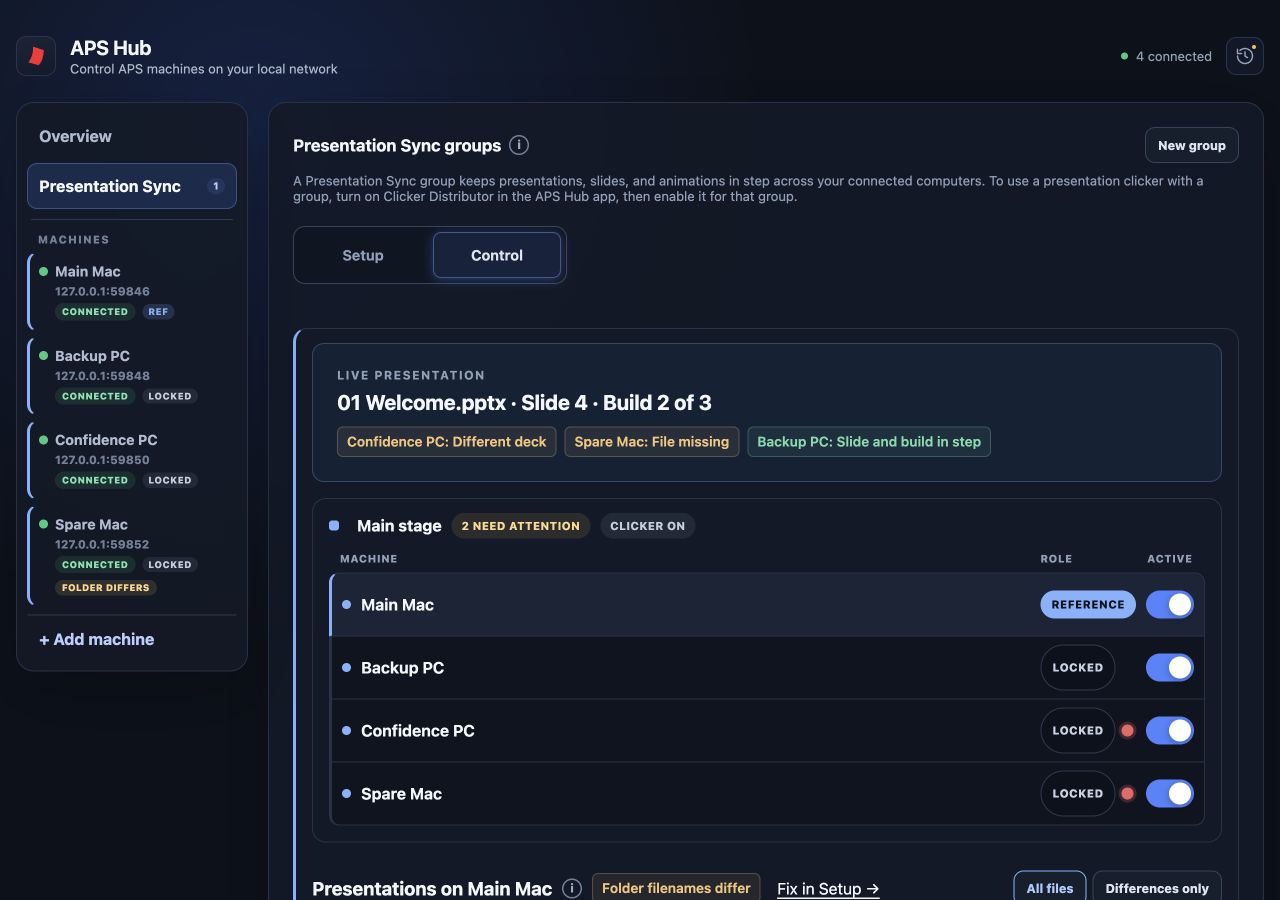
| Status | Meaning and action |
|---|---|
| Reference identity needs review | A different APS installation is answering the reference’s saved address. Hub holds followers and blocks group clicker actions until the intended identity is accepted on its machine page. |
| Locked | The reported slide and build match the reference. When the reference is idle, Locked means the member is ready to follow when presenting resumes; read the detail. |
| Slide locked | The slide matches. This is the expected level for slide-only content such as PDFs; it does not claim animation-build alignment. |
| Presentation locked | Hub can verify the displayed presentation, but position feedback is limited. Check the slide on the actual output. |
| Build unverified | Slide information is available, but the animation/build position cannot be confirmed reliably. Rehearse the affected builds and check the presentation application's feedback. |
| Preparing / Checking position / Correcting / Opening / Closing | Hub is waiting for feedback or carrying out an alignment action. Brief transitions are normal. Investigate if the same state persists. |
| File missing | The locked computer cannot find the required presentation. Check its filename and the selected watched folder. |
| Different presentation / Out of step | The locked computer is on a different presentation, slide, or build. Hub is waiting for feedback or a further state change after its alignment attempt. |
| Different deck | The slide counts differ, so Hub does not align the position. Check for an outdated or different copy. |
| Reference offline / Connection lost | The reference or locked computer is disconnected. Restore the connection so alignment can resume. |
| Conflicting control | Another controller moved the locked computer after a correction. Resolve that input, then explicitly resume the member. |
| Alignment paused | A slide correction failed or was not confirmed. Hub waits for another slide/build change instead of repeatedly retrying. |
| Close unavailable | This APS version cannot close the presentation document remotely. Update APS to support synchronised closing. |
| Error / Close failed | An operation failed. Read the detail and event history, inspect APS and the presentation app, and retry after resolving the cause. |
Do not repeatedly click controls to force a changing status back to green. First identify whether the issue is a missing file, a different deck, incomplete feedback, or another controller moving the locked computer.
Connected-controller information can help identify another Hub or control surface using the same APS machine. If a locked computer repeatedly moves away from the reference, check who else is controlling it before attempting repeated corrections.
Folder comparison is separate from presentation-position status. Setup lists missing, extra, different and online-only files and where to resolve them. New differences show Syncing for 15 seconds to give shared-folder software time to deliver changes. Pending or unavailable checks are not verified content matches.
11.7. Change the reference or pause a member
In Control, choose Make reference beside the intended computer. Check its deck and position before making the change; the other active members follow the new reference.
Turn a member’s Active switch off to pause it without removing it. It is excluded from sync and distributed clicker actions. Turn Active on to resume; this can change its displayed presentation and position. Add or remove group members in Setup.
Pausing or removing the reference leaves the group without a reference and disables its clicker distribution. Choose an active reference again and check the group's clicker setting before continuing. Pausing a locked computer does not pause the reference or the other members.
11.8. Multiple groups and rehearsal
Create separate groups for independent stages or presentation systems. Give each a clear name and reference. Machine and group definitions are saved across restarts, but you should recheck the reference, connections, watched folders, and enabled clicker groups after restarting.
Before a live session, test opening and ending a deck, moving forward and back through animations, switching the reference, pausing and resuming a backup, and reconnecting a machine. Verify the actual output on every computer, including fonts and media. Keep your normal plan for selecting the main or backup video feed.
12. Clicker Distributor
Clicker Distributor receives assigned keyboard keys on the Hub computer and sends the corresponding APS action to eligible members of enabled groups. A USB clicker usually behaves like a keyboard, so its receiver belongs on the computer running Hub.
12.1. Enable distribution
- Create a sync group, connect its machines, and choose an active reference.
- Plug the clicker receiver into the Hub computer.
- Open Clicker Distributor from the native Hub menu.
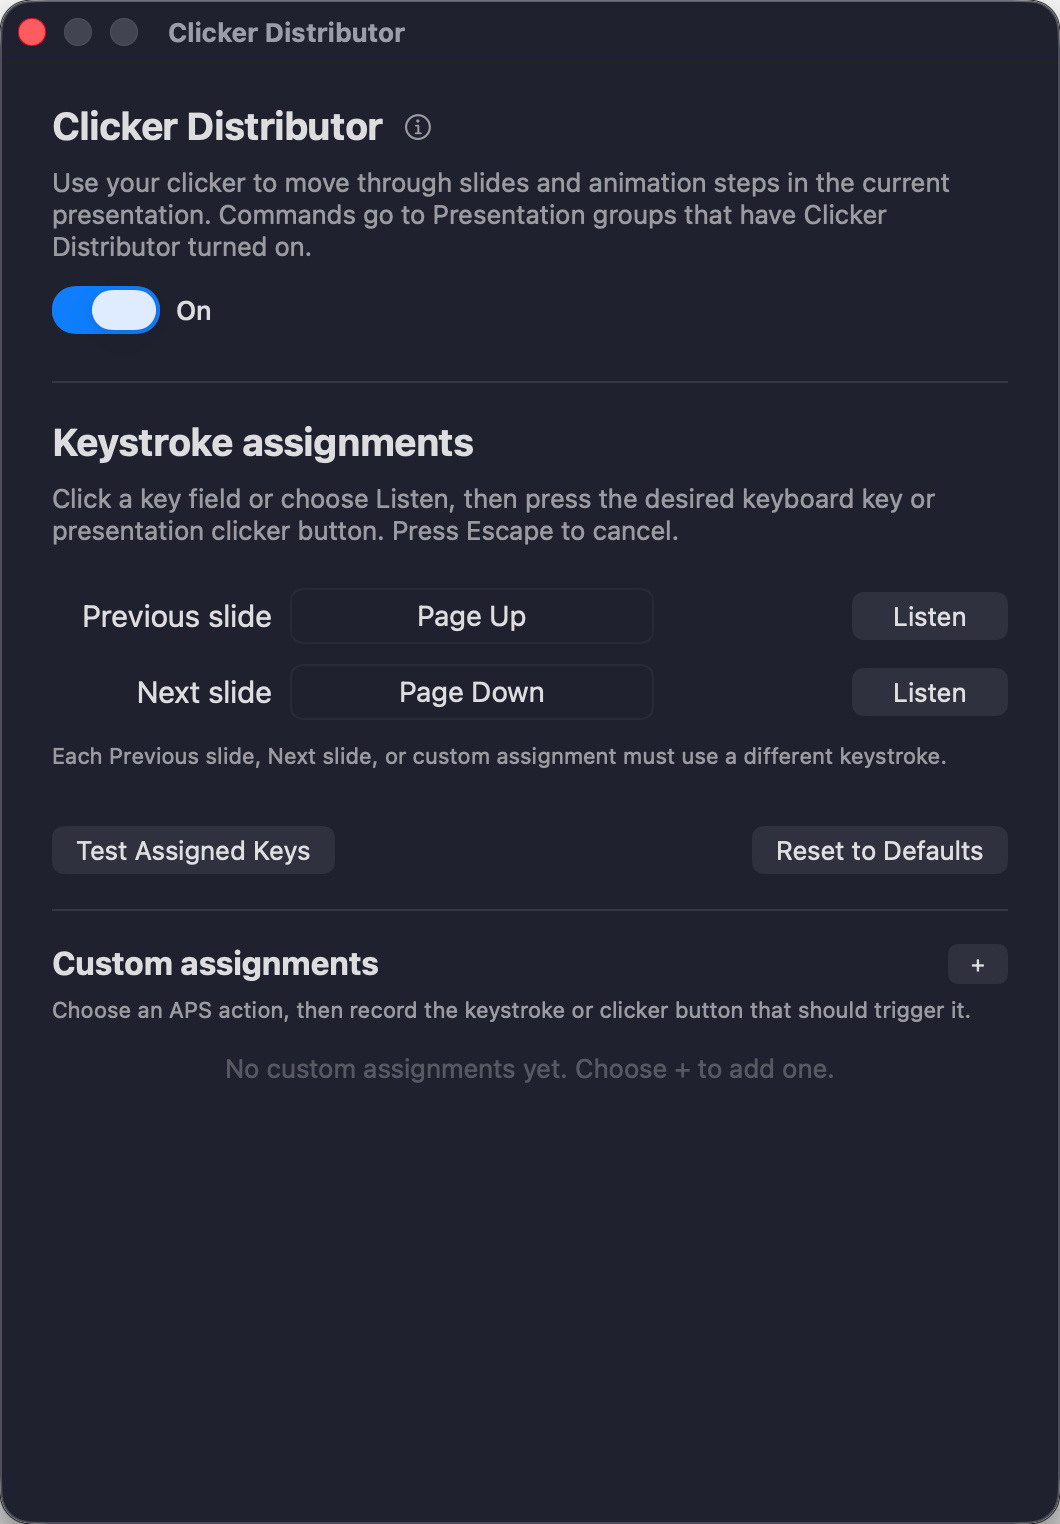
- Enable the distributor's master switch and resolve any permission request.
- In the browser’s Presentation Sync → Setup, enable Clicker Distributor for each group that should receive the actions.
- Open a presentation on the reference and test one forward and one backward press while watching every output.
Both the desktop master switch and the target group's switch must be enabled. More than one group can be enabled, so check the other groups before testing a clicker.
12.2. Allow keyboard access on Mac
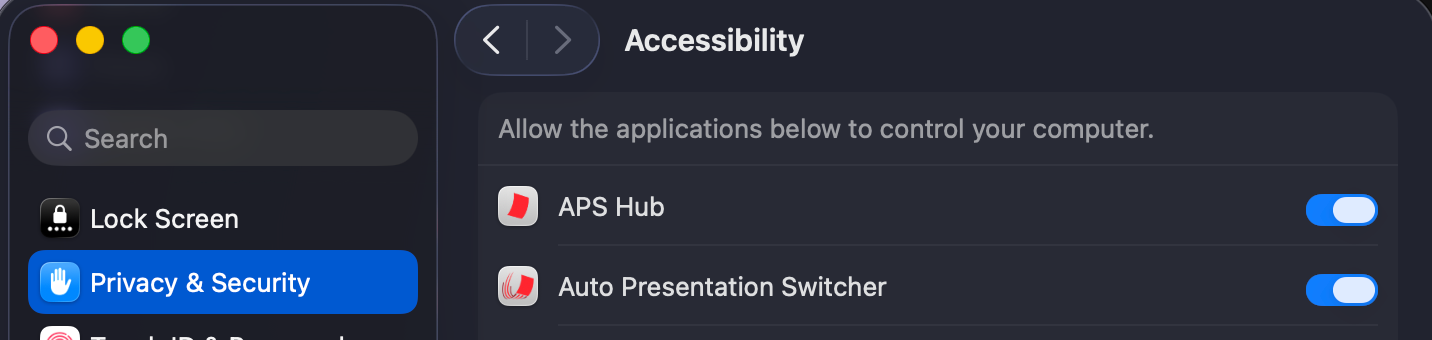
The current Mac app uses Accessibility permission to capture and consume assigned keys. Follow Hub's permission prompt, open System Settings, and enable APS Hub under Privacy & Security → Accessibility. Return to Hub and follow any request to retry or reopen the app.
This is permission for APS Hub on the Hub computer. It is separate from the permissions that APS needs on each presentation computer. The browser's App Permissions tab reports APS permissions, not Hub's clicker access.
12.3. Assign and test keys
The default actions are Previous slide (Page Up) and Next slide (Page Down). These move through slides and animation steps in the current presentation. If your clicker sends different keys, select the assignment field or its Listen control and press the desired button. Modifier keys are part of the assignment: a key with Shift is different from the same key without Shift.
Use the add control to create extra assignments for available actions, including blackout, freeze, and still-image banks 1–10. Avoid assigning the same key combination to competing actions. Resetting to defaults restores the standard Previous slide and Next slide assignments.
On Windows, a key can be marked Reserved for APS when local APS cannot hand that key over to Hub. Update the local APS installation or choose an available assignment. If Hub reports that it is waiting for keyboard ownership or asks you to release a held key, follow that status before testing distribution.
Use Test Assigned Keys to check what Hub receives. While this test is active, assigned keys are tested without relaying their presentation commands. Choose Cancel Test when finished, then perform a normal output rehearsal.
12.4. Which machines receive an action?
For Next slide and Previous slide to work, the reference computer must be connected and showing a presentation. The commands go to the connected computers in the group that are not paused. This includes APS on the Hub computer if it belongs to the group. Offline and paused computers skip the button press; they do not receive it later.
Still images, Blackout, and Freeze can work without an open presentation. Hub uses the reference computer's reported output to decide what to send to the locked computers. For image buttons, prepare the intended image in the same bank number on every computer.
Presentation Sync checks that the computers stay in step after each forward or backward press. If you see Conflicting control, check whether another clicker, Hub, or controller is also operating that computer. Stop the competing control, then choose Resume. For other warnings, read the sync status explanation.
A reference whose identity needs review blocks actions for the group.
12.5. Avoid double advances
A double advance can happen when a computer receives the same button press twice: once directly from the clicker hardware and once from Hub's Clicker Distributor. This can affect the reference computer as well as locked computers, because Clicker Distributor sends slide commands to both.
Some professional clicker systems from DSan and Interspace can control several computers at once. Choose one of these setups:
- Let the hardware distribute the clicks. If it already sends each press to every computer in the group, leave Clicker Distributor turned off for that group.
- Let Hub distribute the clicks. Connect the receiver only to the computer running APS Hub, then enable Clicker Distributor for the group. Disconnect or disable the hardware's connections to the other presentation computers, so they receive each press only from Hub.
For example, if Hub is running on your main computer and distributes clicks to your backup, do not also connect a clicker receiver directly to the backup. It could receive the hardware press and Hub's command, moving forward twice instead of once. Another APS Hub or control app sending the same clicks can also cause double advances. If Hub shows a Conflicting control warning, see the sync status explanations.
13. APS Hub settings
Open Settings from the native APS Hub menu on the Hub computer. These settings control Hub itself. They are separate from the APS settings shown in a selected machine's browser tab.
13.1. Network access and control-page address
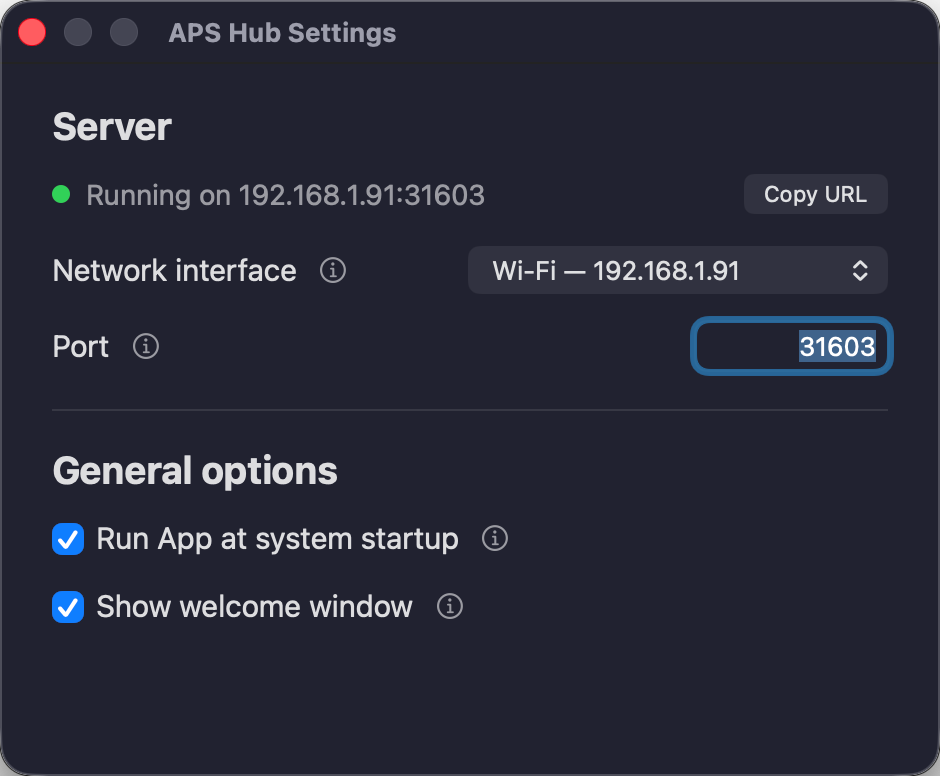
Choose whether Hub uses all available networks, a selected network interface, or local-only access. This scope affects the control page and Hub's network services, including discovery, APS connections, and transfers.
Local only is suitable when everything that needs to connect is on the Hub computer. To control APS computers or open the browser page from another device, choose the appropriate reachable network.
The normal control-page port is 31603. If you change the interface or port, use the new address when reopening the page and update saved browser bookmarks. An already open tab can lose its connection during this change.
Hub's page port, APS's control port, and APS's incoming-file port serve different purposes. Changing Hub's port does not change the ports configured in APS.
13.2. Startup and saved configuration
Enable the startup option if Hub should launch when you sign in. Choose whether its welcome window appears at launch. Hiding the welcome window does not stop the background service; reopen the control page from the menu bar or system tray.
Hub remembers saved machines, group definitions, and clicker assignments. After a restart, confirm which machines have reconnected, which reference each group uses, and whether the intended clicker groups and desktop master switch are enabled before accepting presenter input.
APS has its own startup behaviour on each presentation computer. Hub's startup setting does not launch APS on another machine. Configure and check APS separately.
13.3. Updates, restarts, and quitting
APS Hub checks for updates when the app starts and shows an update window if a new version is available. It does not check again automatically while the app remains open. To check later, choose Check for Updates… from the APS Hub menu. Read the release notes and follow the update instructions for your platform. Update between sessions so you have time to reconnect and rehearse.
Quitting or restarting Hub interrupts its browser service, group alignment, and clicker distribution. APS remains a separate application on each computer, but it will no longer receive Hub's coordination until Hub is running and the connections are restored.
14. Event history and troubleshooting
14.1. Review and export events
Open Event history in the Hub web app (/#/events on your Hub’s address) to review operational events such as connection changes and reported problems. Recent notifications help you notice an issue; the history provides context when you need to investigate it.
Filter by time, machine, severity, or event type to narrow the list. Read the event detail and compare the time with the operator action that triggered it. Export the relevant results as CSV when you need to retain them or share them with support.
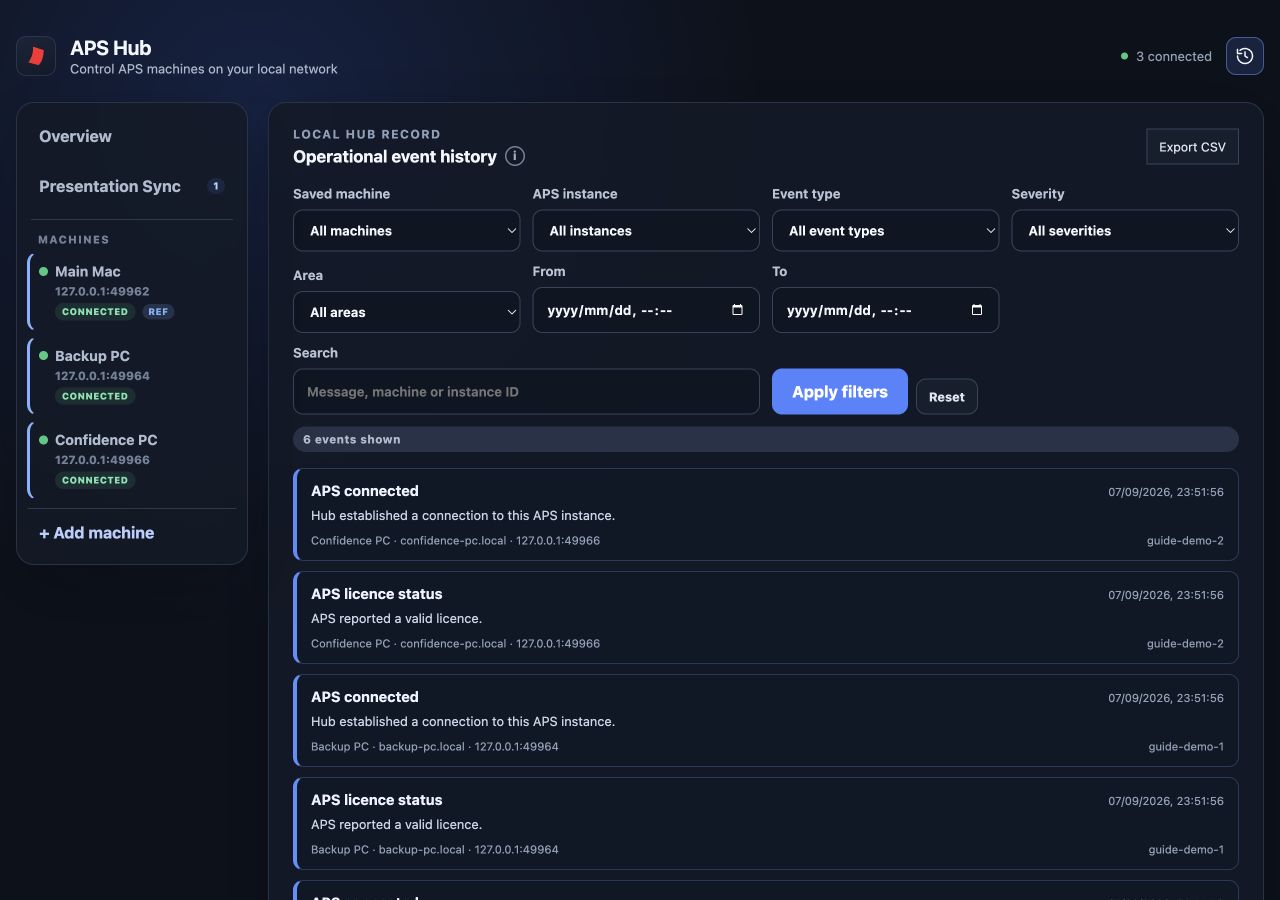
Operational history is not a recording of every screen or every action inside a presentation application. Check APS and the application's own state as well.
14.2. The control page cannot be opened
- Check that the APS Hub desktop app is running.
- Use Open Control Page on the Hub computer to confirm its current address.
- From another device, use the Hub computer's network IP address, not localhost or 127.0.0.1.
- Check Hub's selected interface, local-only setting, and control-page port.
- Check the firewall and whether the network permits communication between devices.
If Hub opens locally but not remotely, focus on network access, the address, and the firewall. If it does not open locally either, inspect Hub's native status and restart it at a suitable time.
14.3. APS is missing, offline, or a control is unavailable
Confirm APS is running on the intended computer and that its Control API port matches the saved Hub entry. If discovery is blocked, try a manual connection to the actual APS address. Check that Hub's selected network can reach it and that the firewall permits the connection.
When a machine connects but a feature is unavailable, check the APS version, platform, licence, permissions, and reported capabilities. Native dialogs and first-run prompts may require attention on the presentation computer. On Mac, use App Permissions to identify missing access and restart APS if instructed.
If an address now belongs to another installation, inspect the identity warning rather than repeatedly reconnecting. Accept the replacement only after verifying the computer.
14.4. A locked computer is out of sync
- Check that the intended reference is active, connected, and showing the correct presentation.
- Check that the locked computer is connected and not paused.
- Read its status and detail using the sync status reference.
- For missing or different presentations, compare filenames, watched folders, deck revisions, and slide counts.
- For unverified builds, inspect the presentation application's feedback and rehearse the affected animations.
- For conflicting control, stop the other input or controller, put the reference at the intended position, then resume the locked computer when ready.
Do not promote an out-of-position locked computer to reference simply to clear its warning. Changing the reference tells the rest of the group to follow that machine's state.
Check folder comparison separately from slide and animation alignment. Missing, different or online-only files need attention even when the currently displayed presentations are in step.
14.5. The clicker does nothing or advances twice
For missing input, check the receiver on the Hub computer, the desktop master switch, permissions, key assignments, and each target group's switch. Exit Test Assigned Keys before testing actual output. For Next slide and Previous slide, the reference computer must be connected and showing a presentation.
For double advances, remove duplicate control paths: another clicker receiver, a second Hub distributor, or a control surface sending the same command. Remember that assigned keys on the Hub computer are consumed and relayed to eligible group members, including local APS. Test a single press while observing the reference and each locked computer.
14.6. Files, images, or media do not appear
For upload errors, check the separate APS incoming-file setting, receiver port, destination folder, and available storage. For a successfully assigned file that will not open, use Finder or File Explorer on the APS computer to locate it, then check the assignment in the APS app and resolve any application or permission dialog. If a watched folder is wrong or unavailable, select the correct folder in APS; Hub cannot browse the computer to find it for you.
For an unexpected visible output, check Now showing and its underlying layers. An image or other layer may be covering the presentation. Check whether you loaded media without starting it, whether playback is paused, and whether Loop overrides Hold at end. Test the file locally if playback still fails.
14.7. Collect useful information for support
Start with Event history in the Hub web app (/#/events on your Hub’s address). Filter the history to the affected computer and the time around the problem, then choose Export CSV. The export uses your selected filters. Include that file when contacting support; see Review and export events.
Include the Hub version, APS versions and operating systems, affected machine and group names, what you expected, what happened, and the approximate time.
Describe the smallest sequence that reproduces the problem. For sync issues, include the filenames, slide counts, reference, locked computer status, and any other controllers connected at the time.
15. More information
These resources complement the Hub guide:
- APS user guide for Mac and APS user guide for Windows — application setup, switching behaviour, media, and platform-specific settings.
- APS Hub — an overview of Hub's role in a presentation system.
- Presentation Sync — setup examples and an introduction to coordinating presentation computers.
- Bitfocus Companion — operating APS from a control surface alongside Hub.
- APS API — connecting other controllers to APS. Use the APS machine's control endpoint, not Hub's browser-page port.
- Downloads and release notes — installers and recent changes.
- PresentationTools support — help with setup and troubleshooting.
When combining Hub with Companion or another controller, decide which computer is the reference and which system sends each action. Avoid having several controllers independently advance the same locked computers.